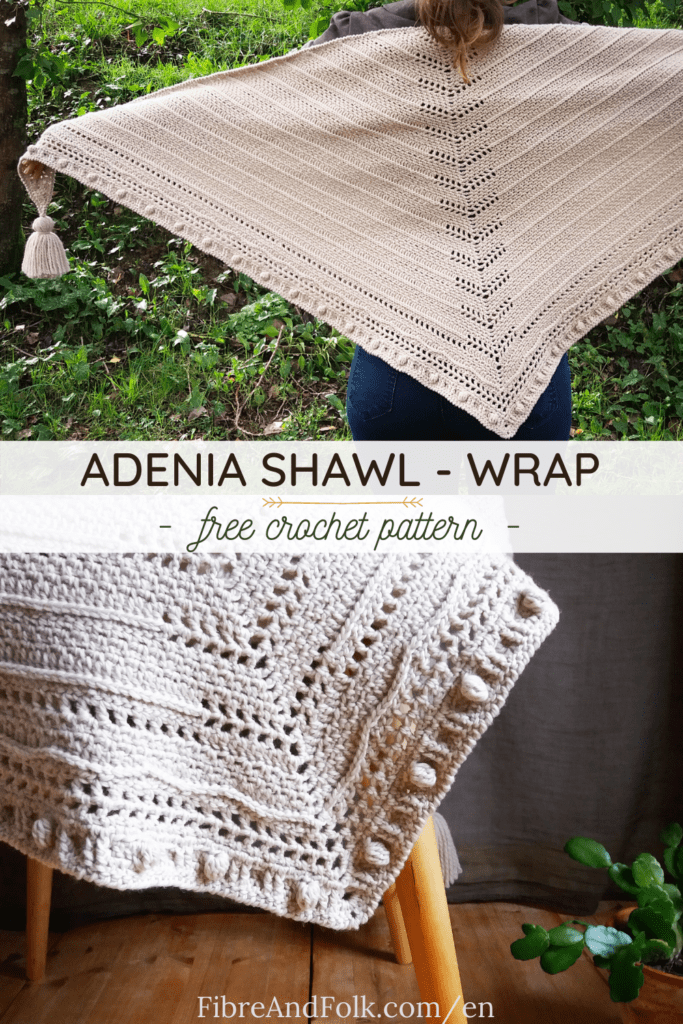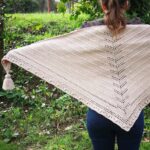

A boho-style & feminine triangle wrap with texture and eyelets, easy to make and which keeps you warm – my Adenia Crochet Shawl – is a free pattern here on the blog! Read through my inspiration, design process and everything on the perfect yarn I chose. Get the free pattern below or purchase the ad-free, printable PDF here. 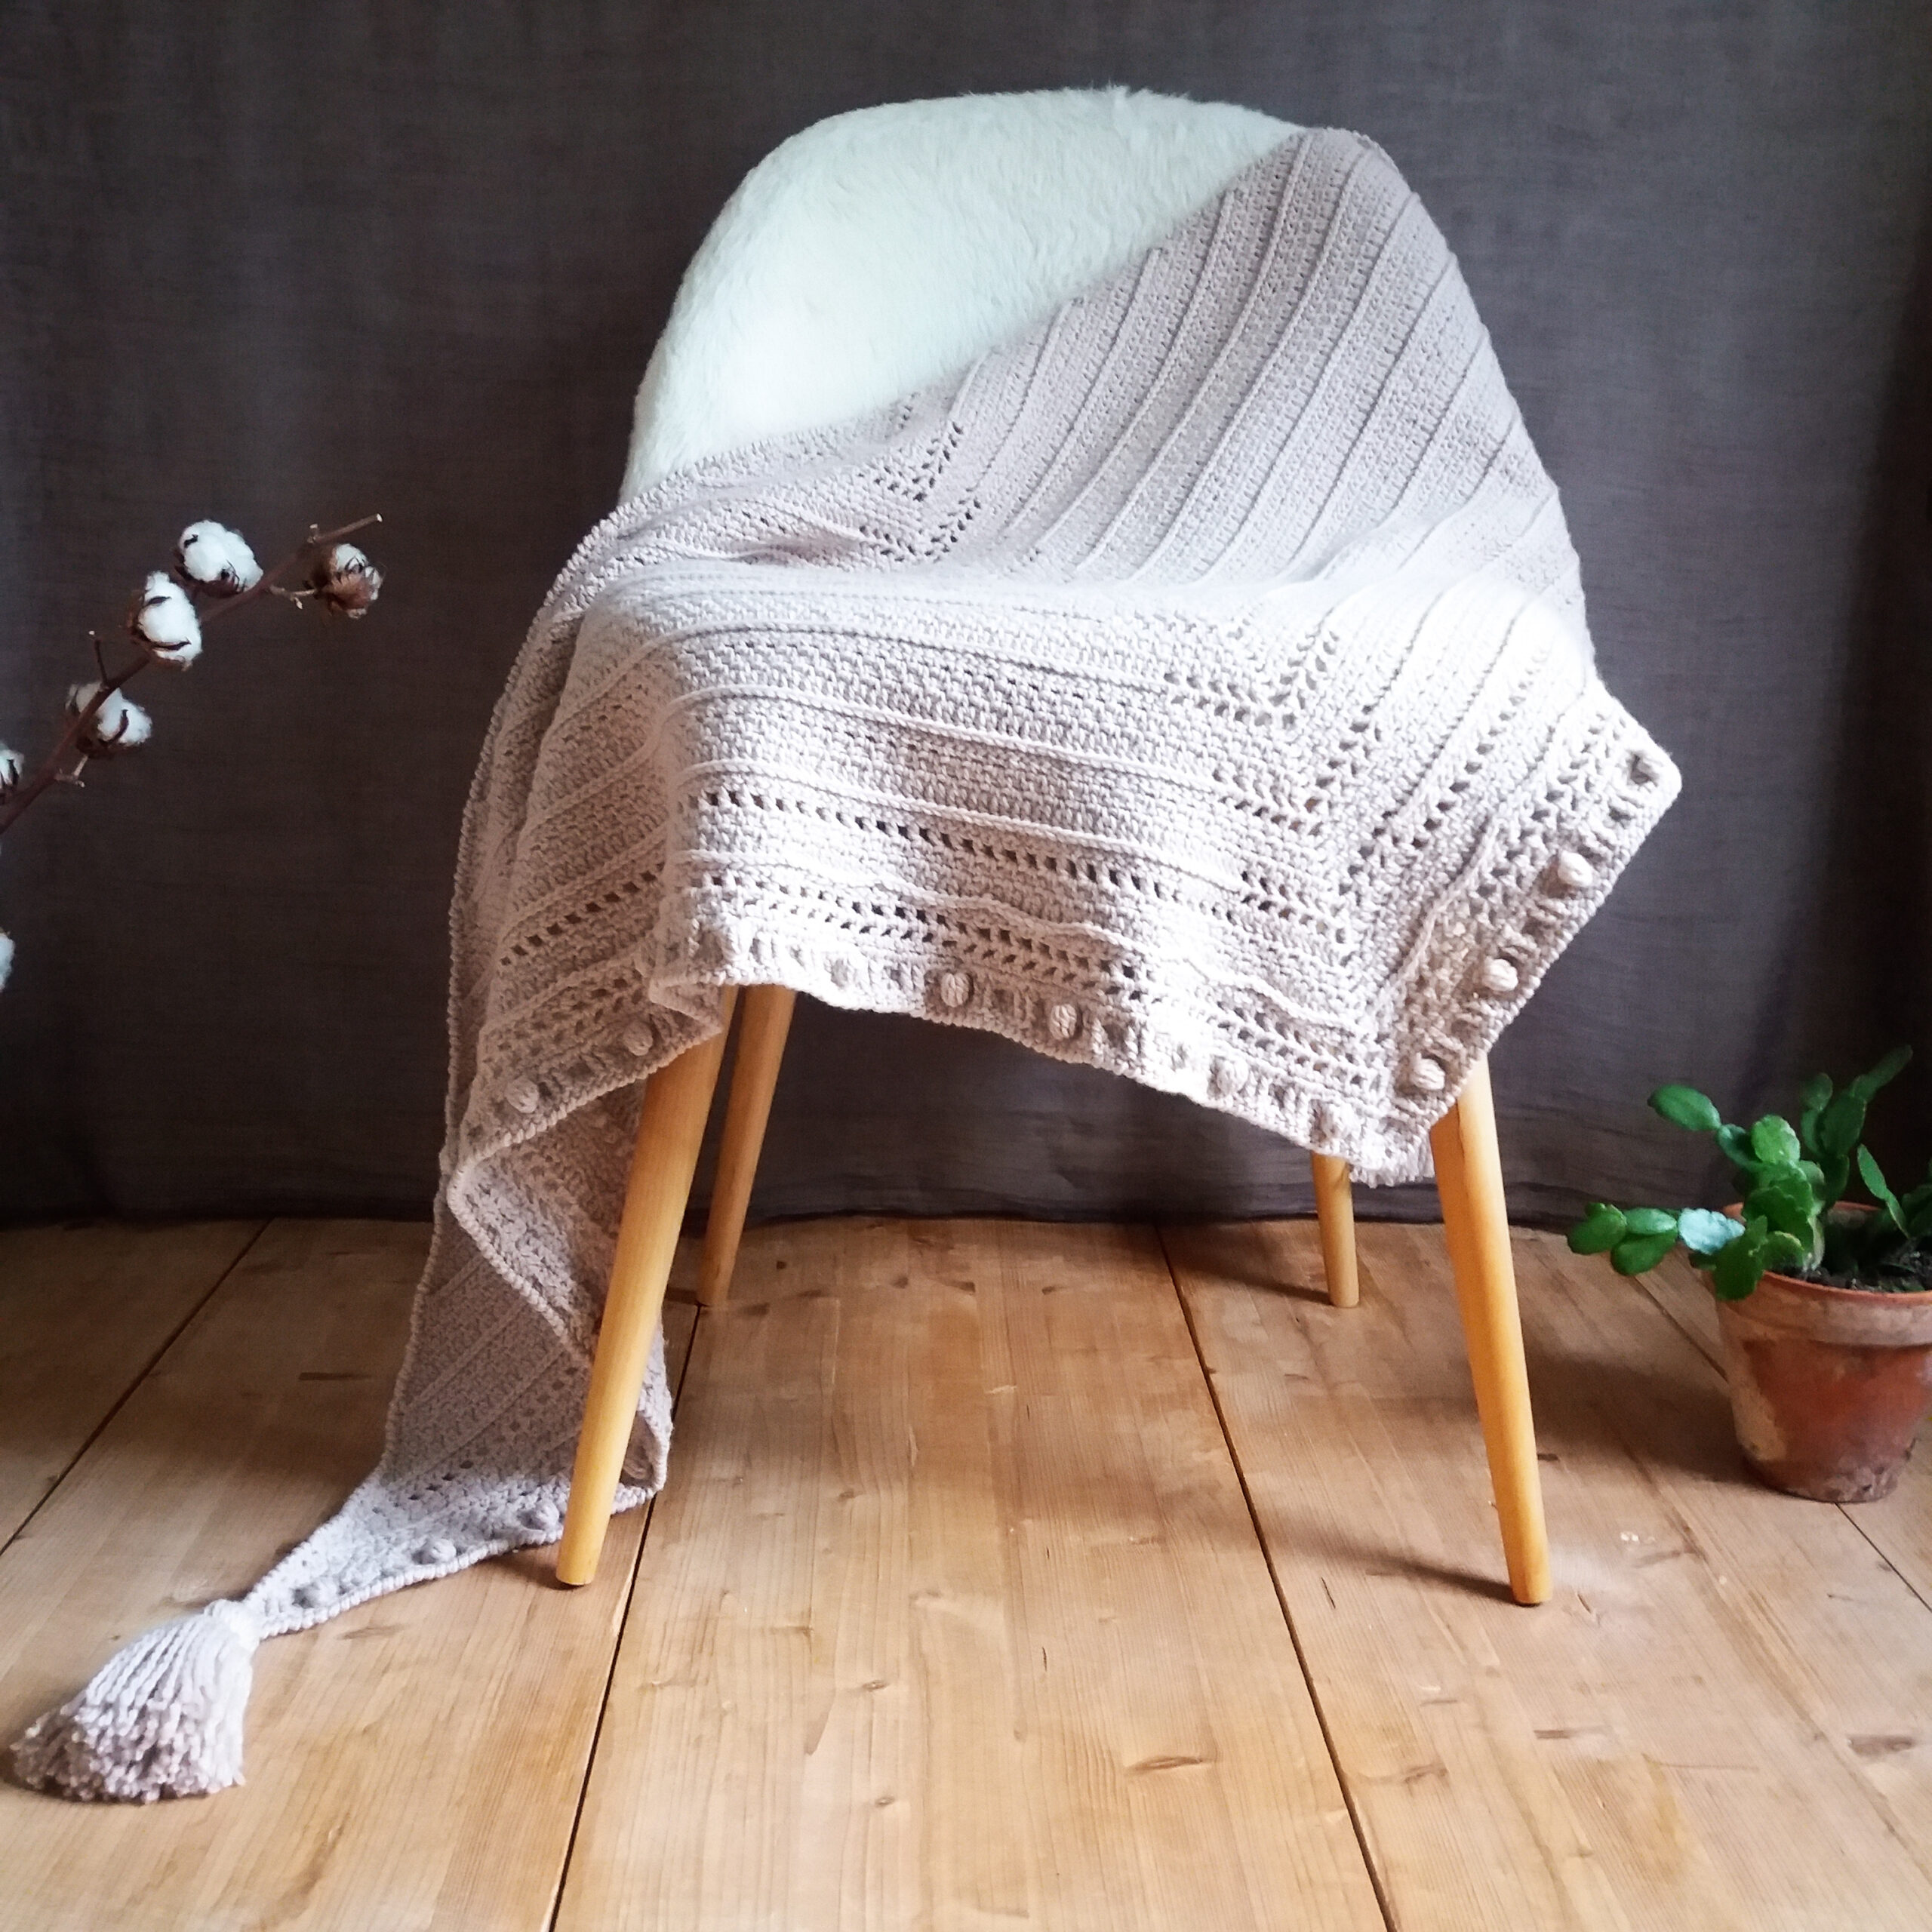
My Inspiration Of The Adenia Wrap
This winter I really had the desire and inspiration for a warm wrap, designed for the Autumn – Winter seasons through early Spring, with textures and few laces compared to light weight airy summer shawls. The idea of a simple and repeating pattern for the main part and a pretty fancy edge took shape.
With its delicate boho-style and yarn tassels, the Adenia wrap reveals a style that is both feminine, discreet and original. It is wide enough to be worn as a scarf for a modern look, or just draped over the shoulders as a classic shawl. In three words: I love it!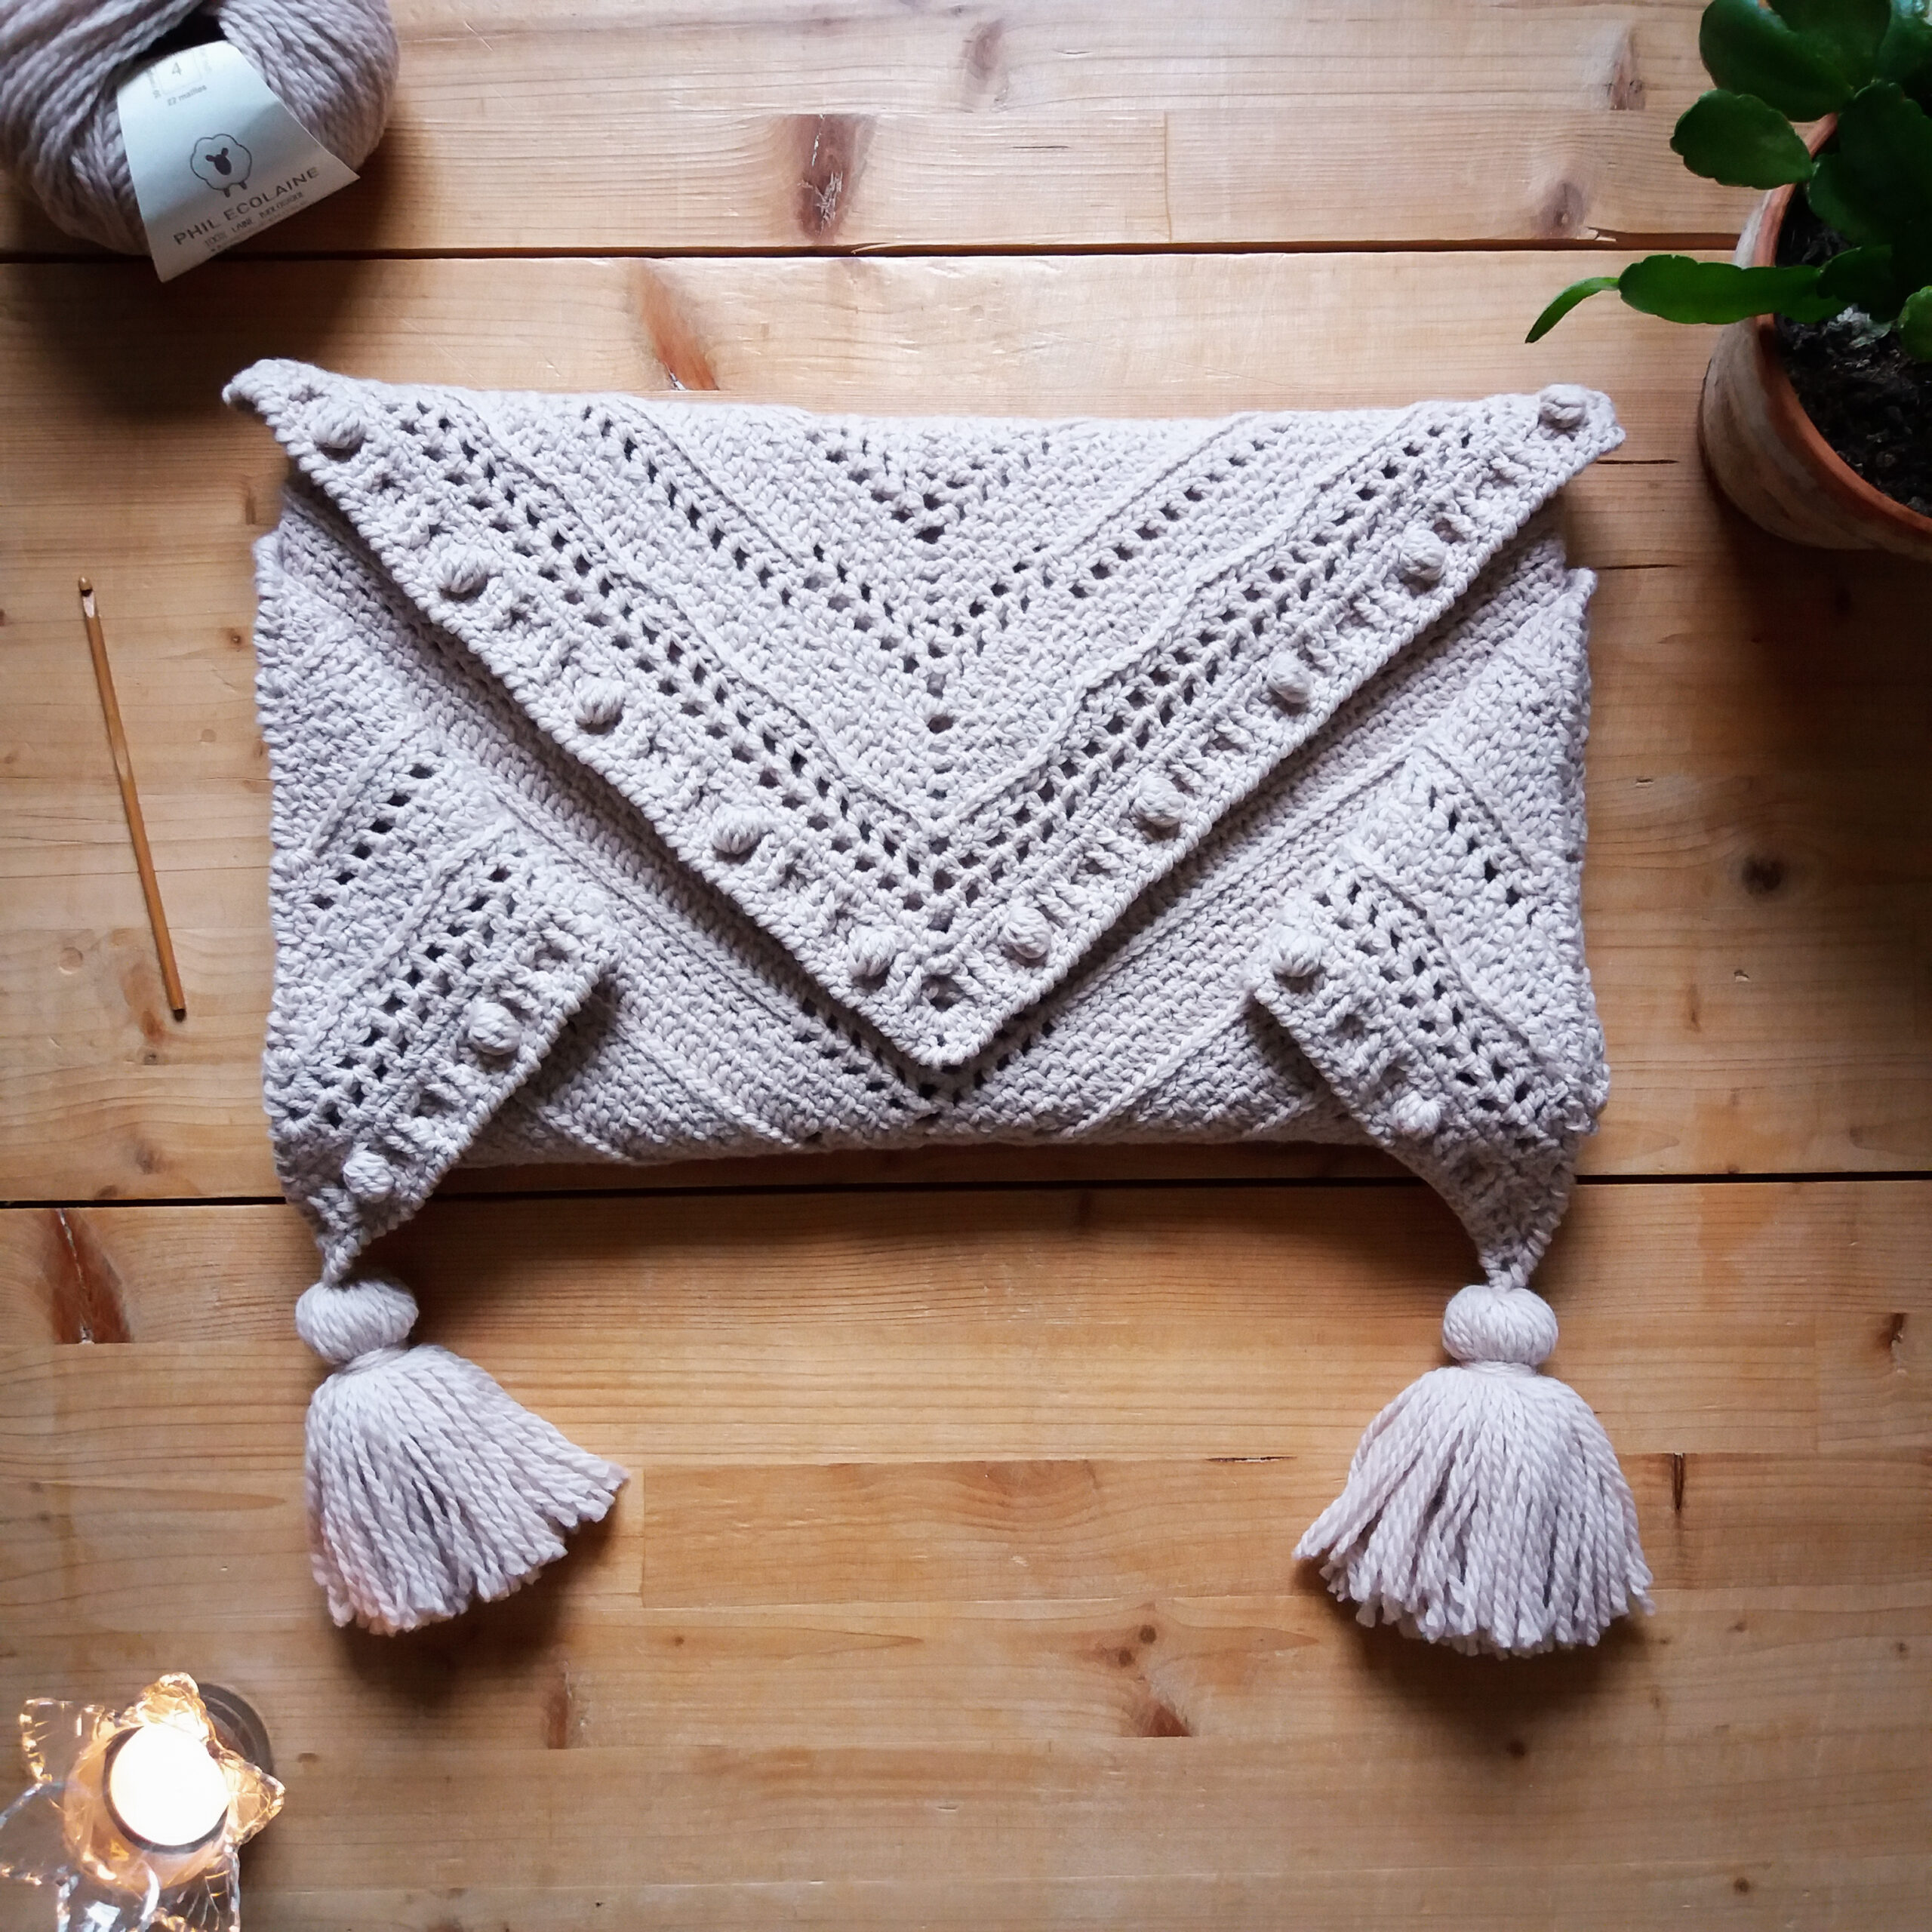
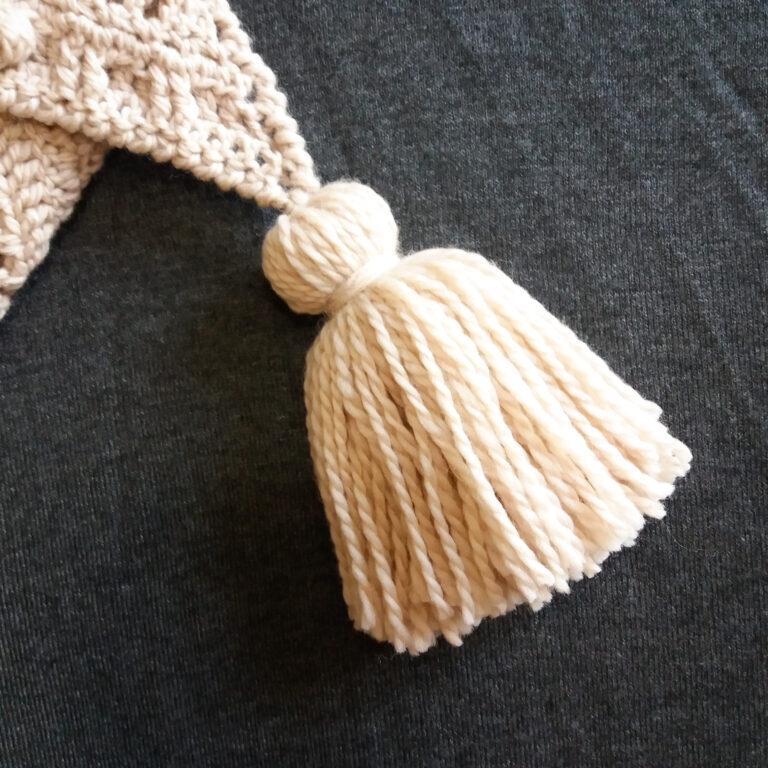
Gimme Tassels !
I love tassels! Beautiful big yarn tassels embellish this Adenia wrap by giving it THE final touch. Find the complete tutorial of yarn tassels with video, written explanations and photos by clicking HERE. They are completely customizable by adjusting the dimensions of the cardboard sheet for the length and / or by adding or removing turns of thread for the thickness. Have fun!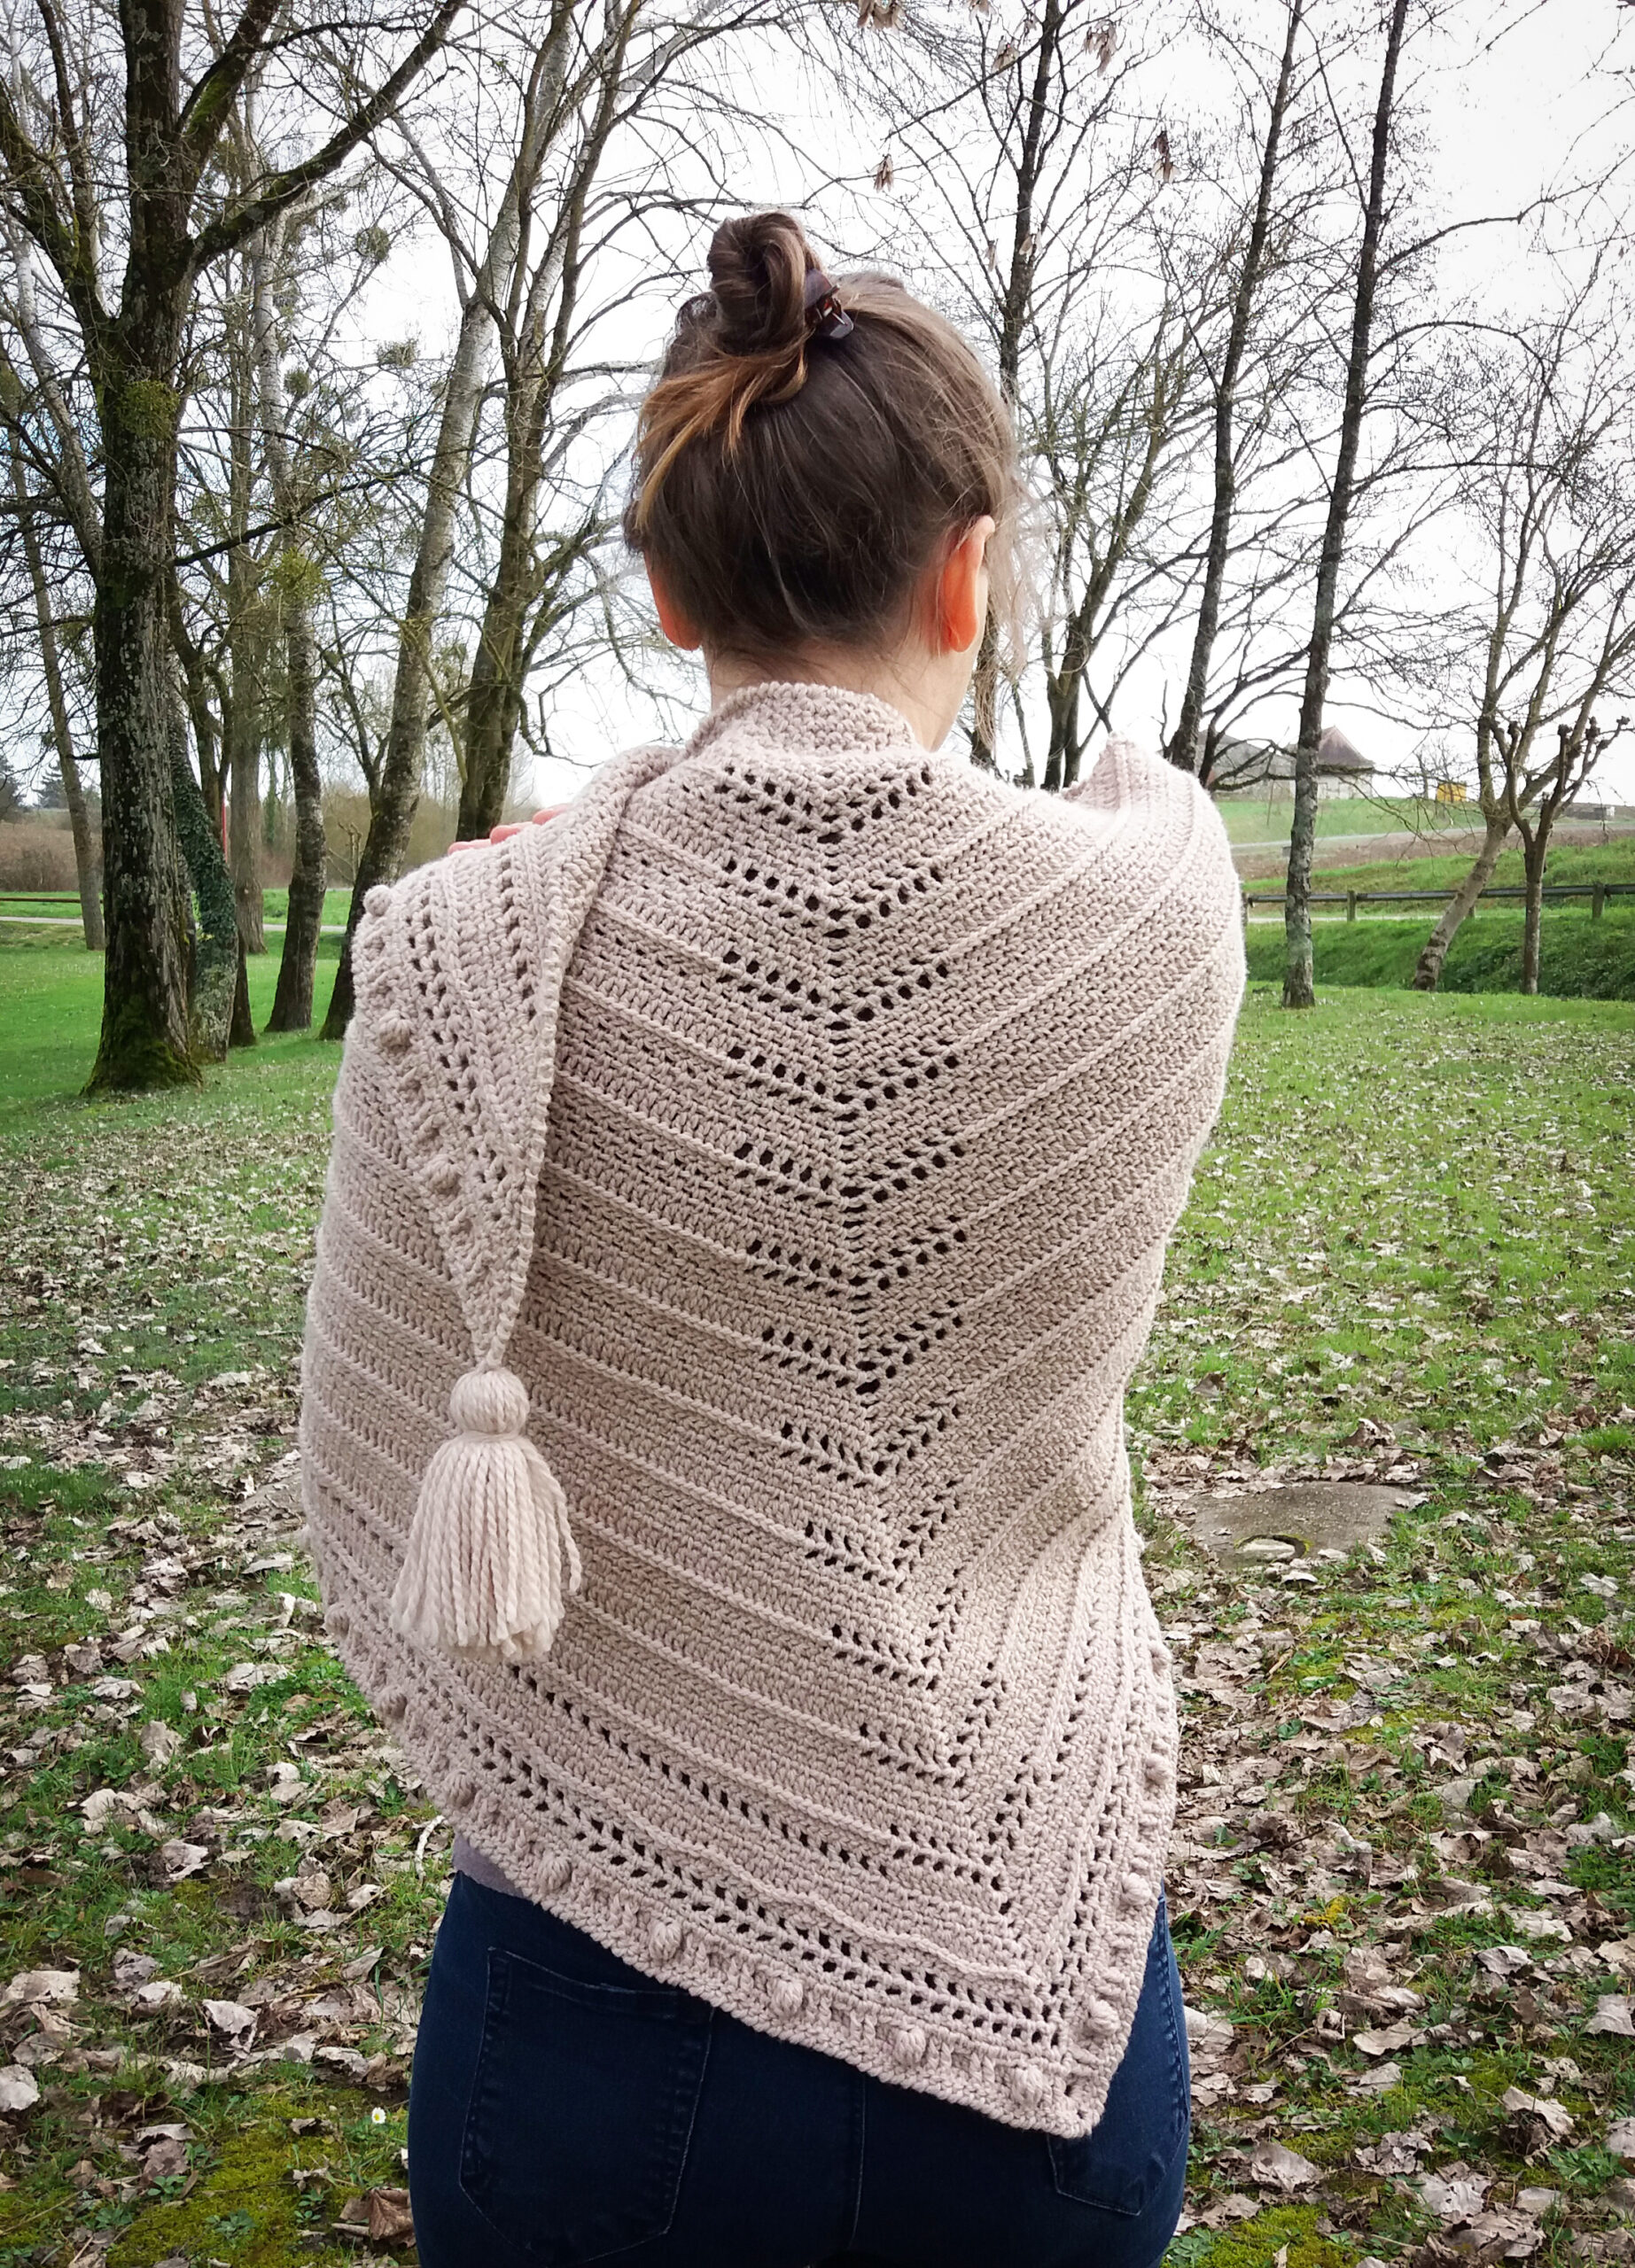
A Beginner Friendly Shawl..
Both beginner crocheters and experienced makers, rejoice! This crochet shawl is easy to make. My wonderful testers team agrees to say that this project is easy to intermediate. Once you get the hang of the repeats (six first rows), you’ll be ready to put on a movie and relax into a mindless project until the fancy edge!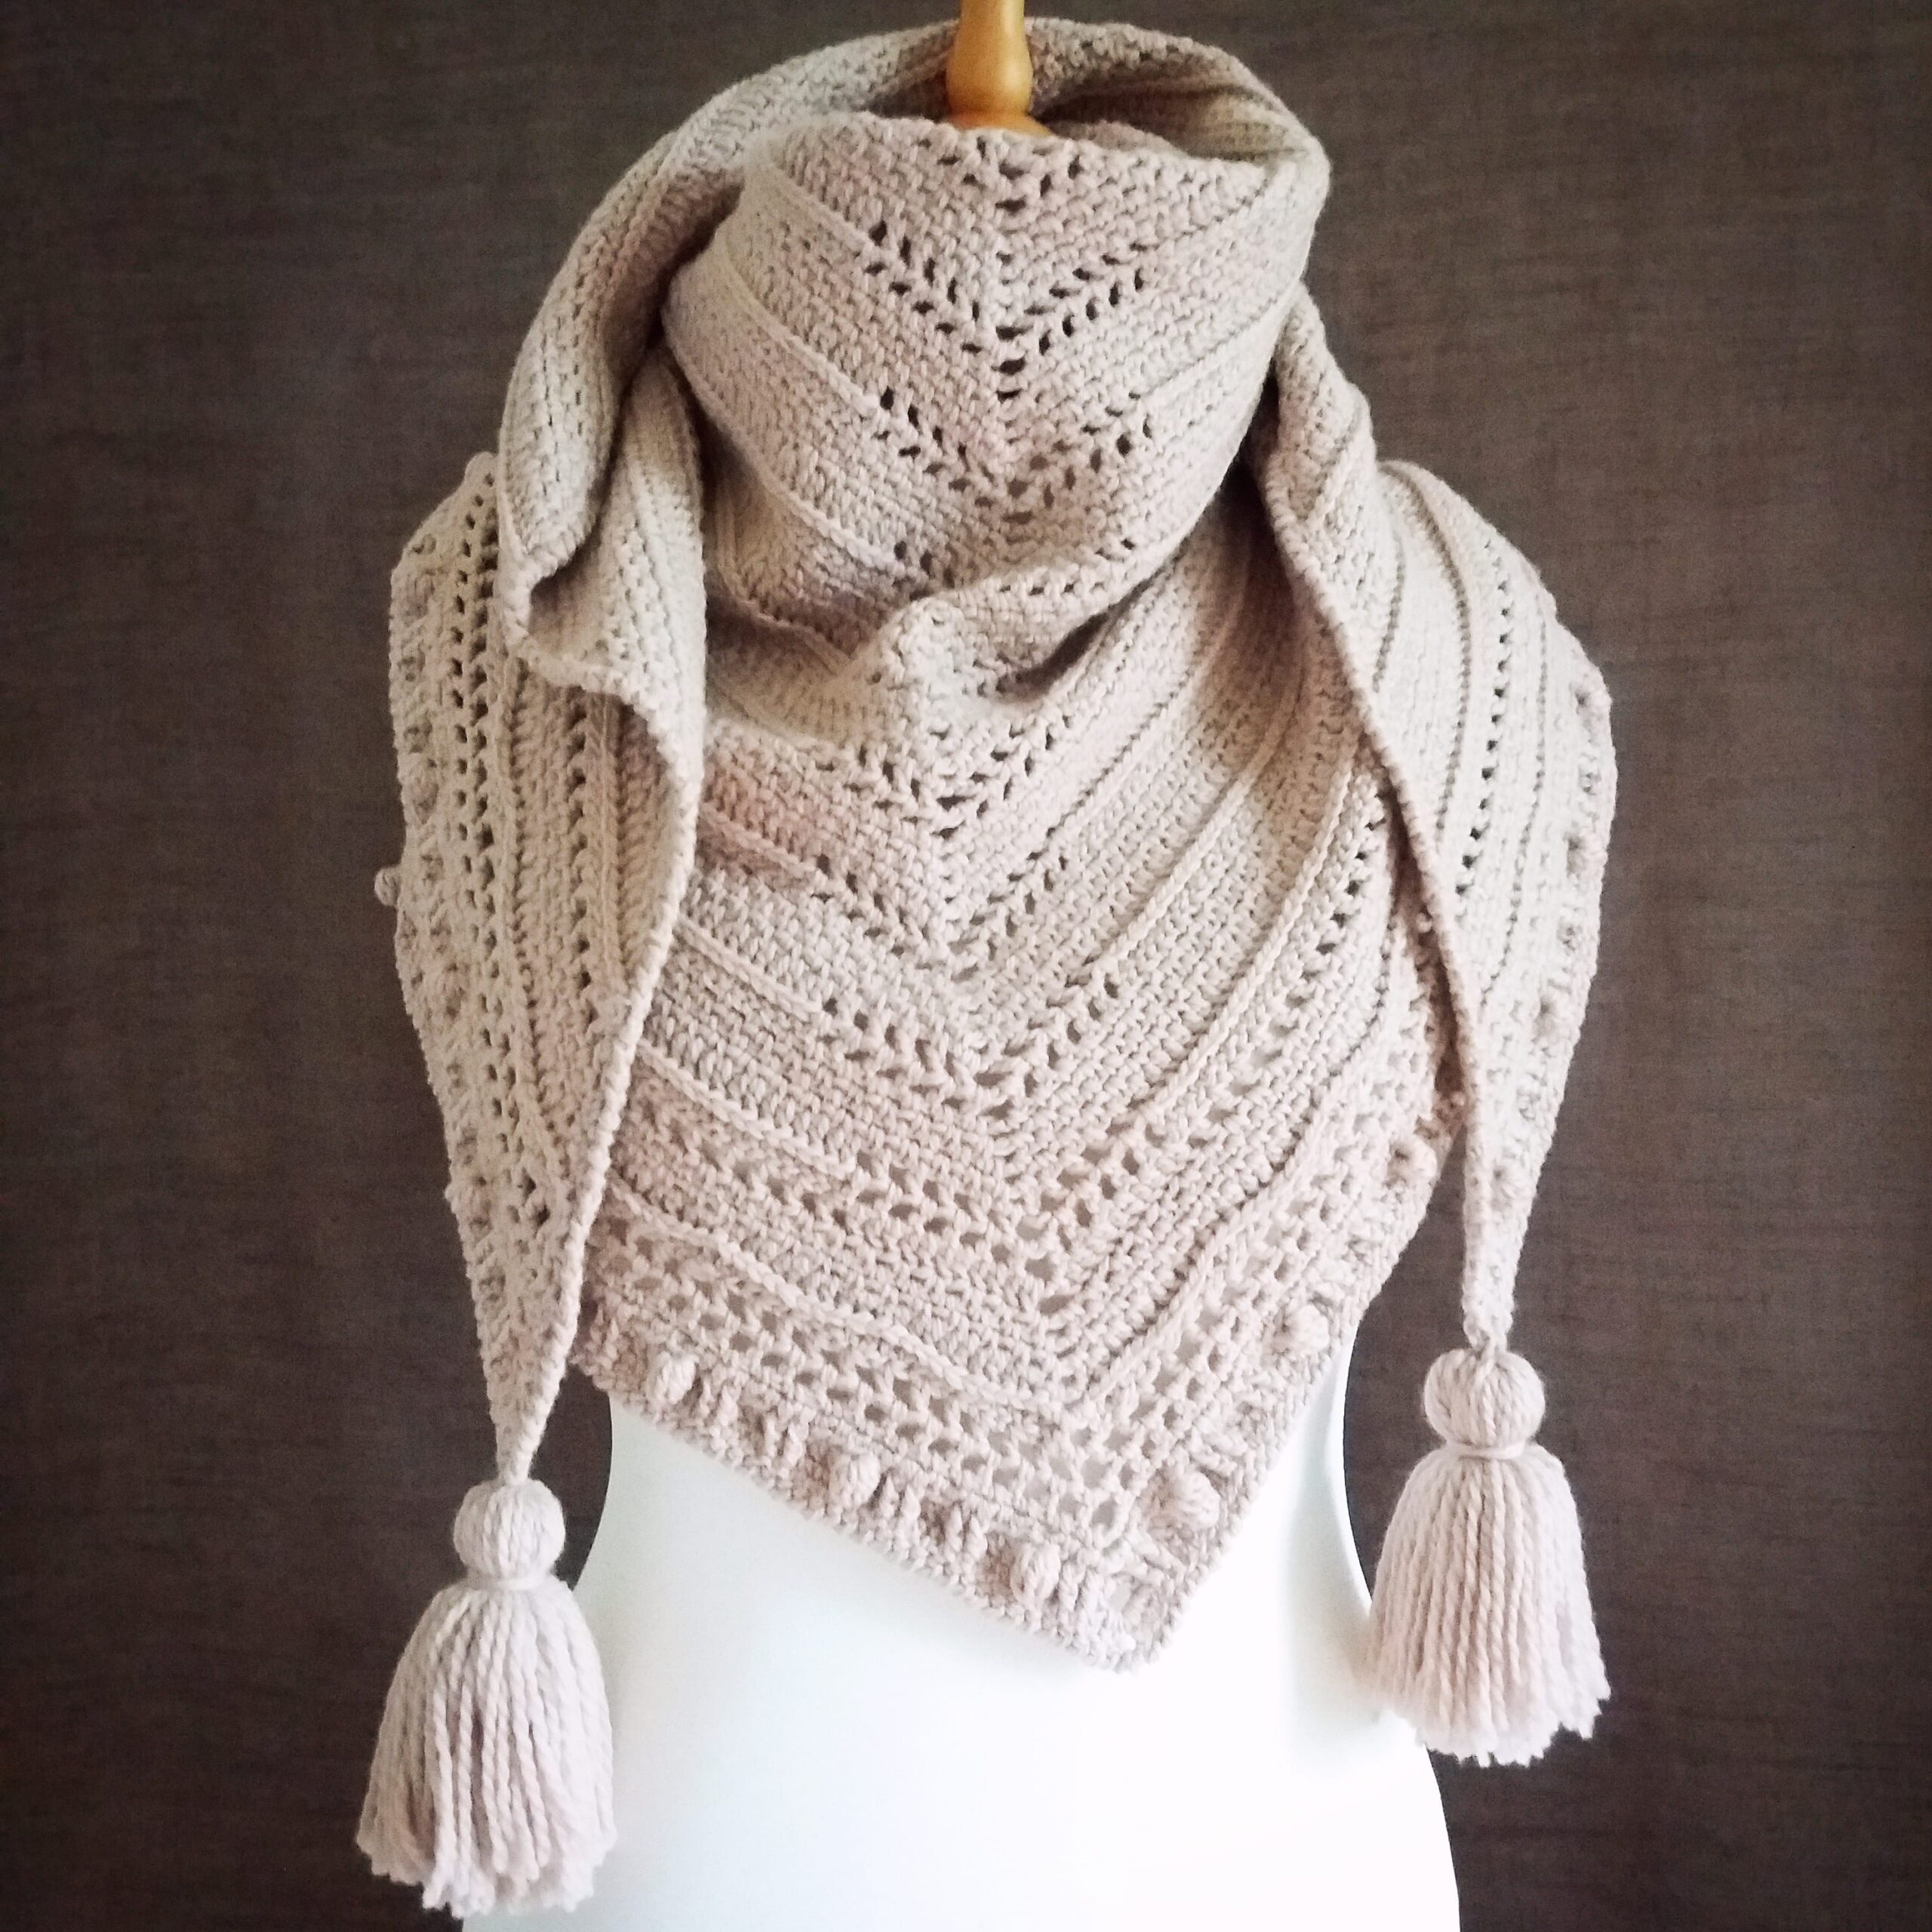
Adenia is a triangular shawl crocheted with a 4.5 mm / US 7 crochet hook, from the center outwards (top down) with increases in the middle and on sides. It consists of a repetition of six rows: four rows in moss stitch (ch, sc), two rows in front post DC forming stripes plus a central eyelets pattern, all the way, in the shape of an arrowhead then a lace edge with textures, eyelets too, bobbles, crab stitches.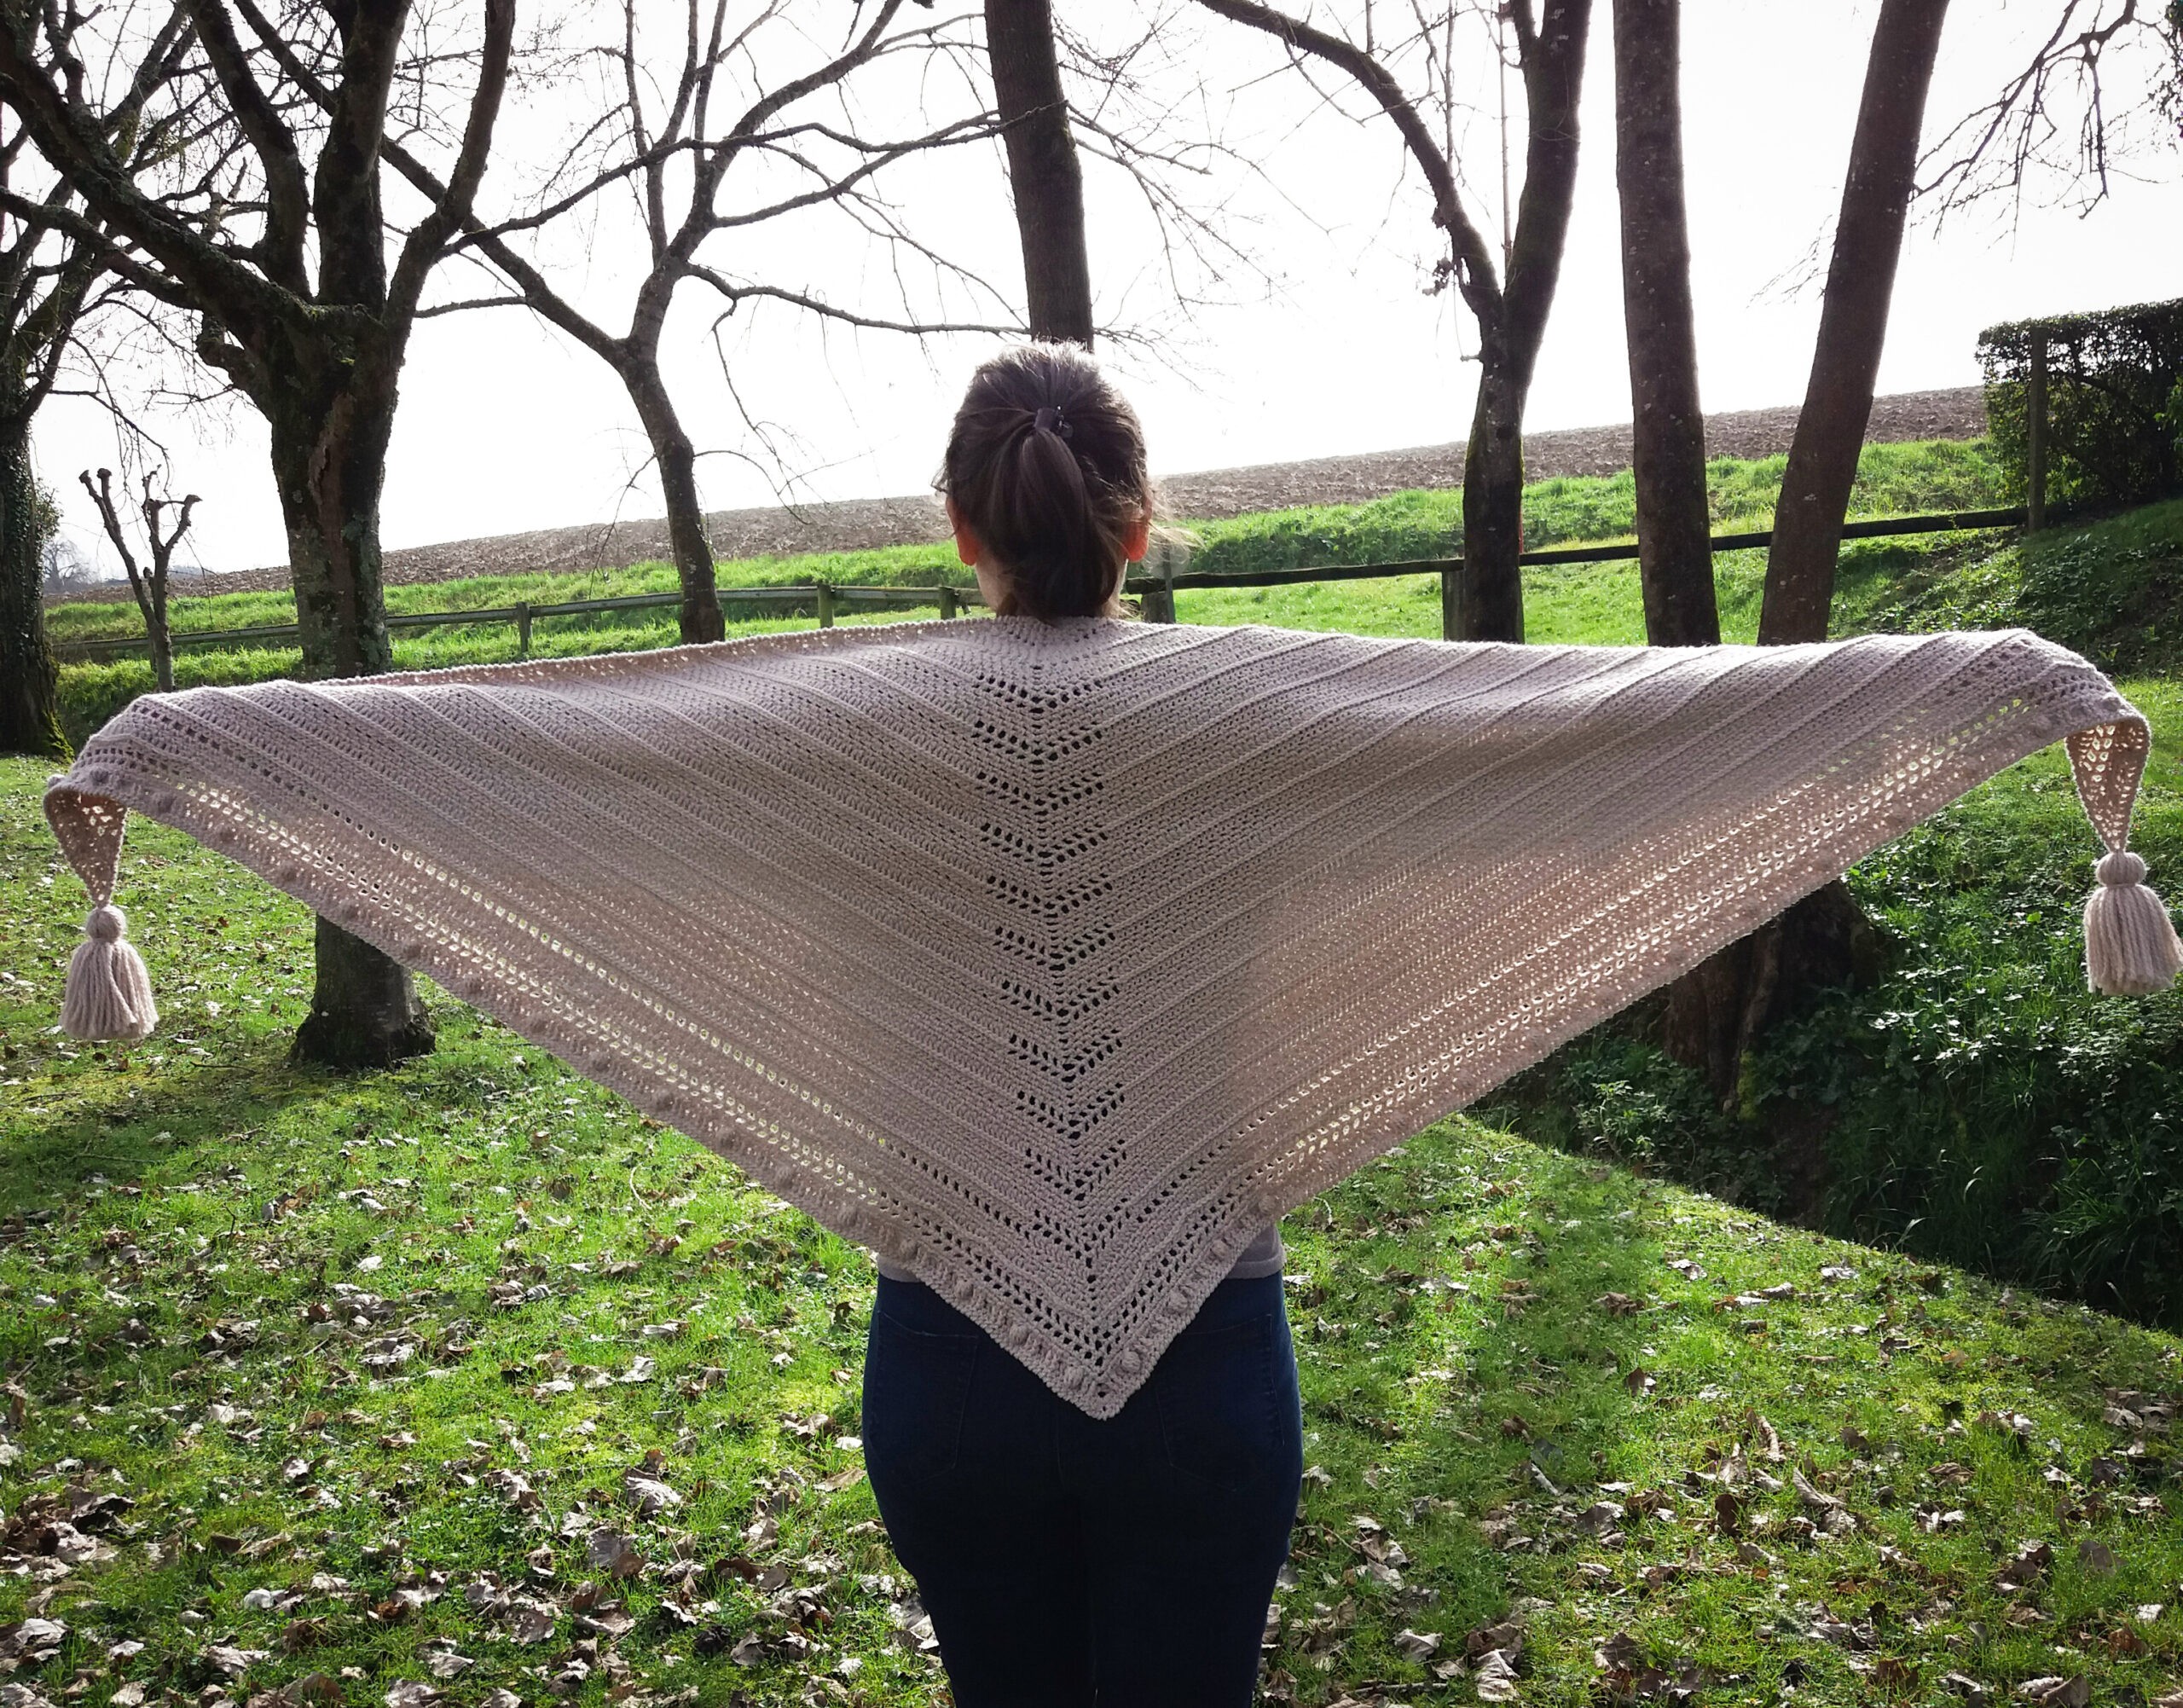
I have included many photos to help beginner crocheters as well as a video showing the front post under loops stitch that may seem tricky but is super simple, you have no more excuses! Go ahead, learn or rediscover crochet stitches!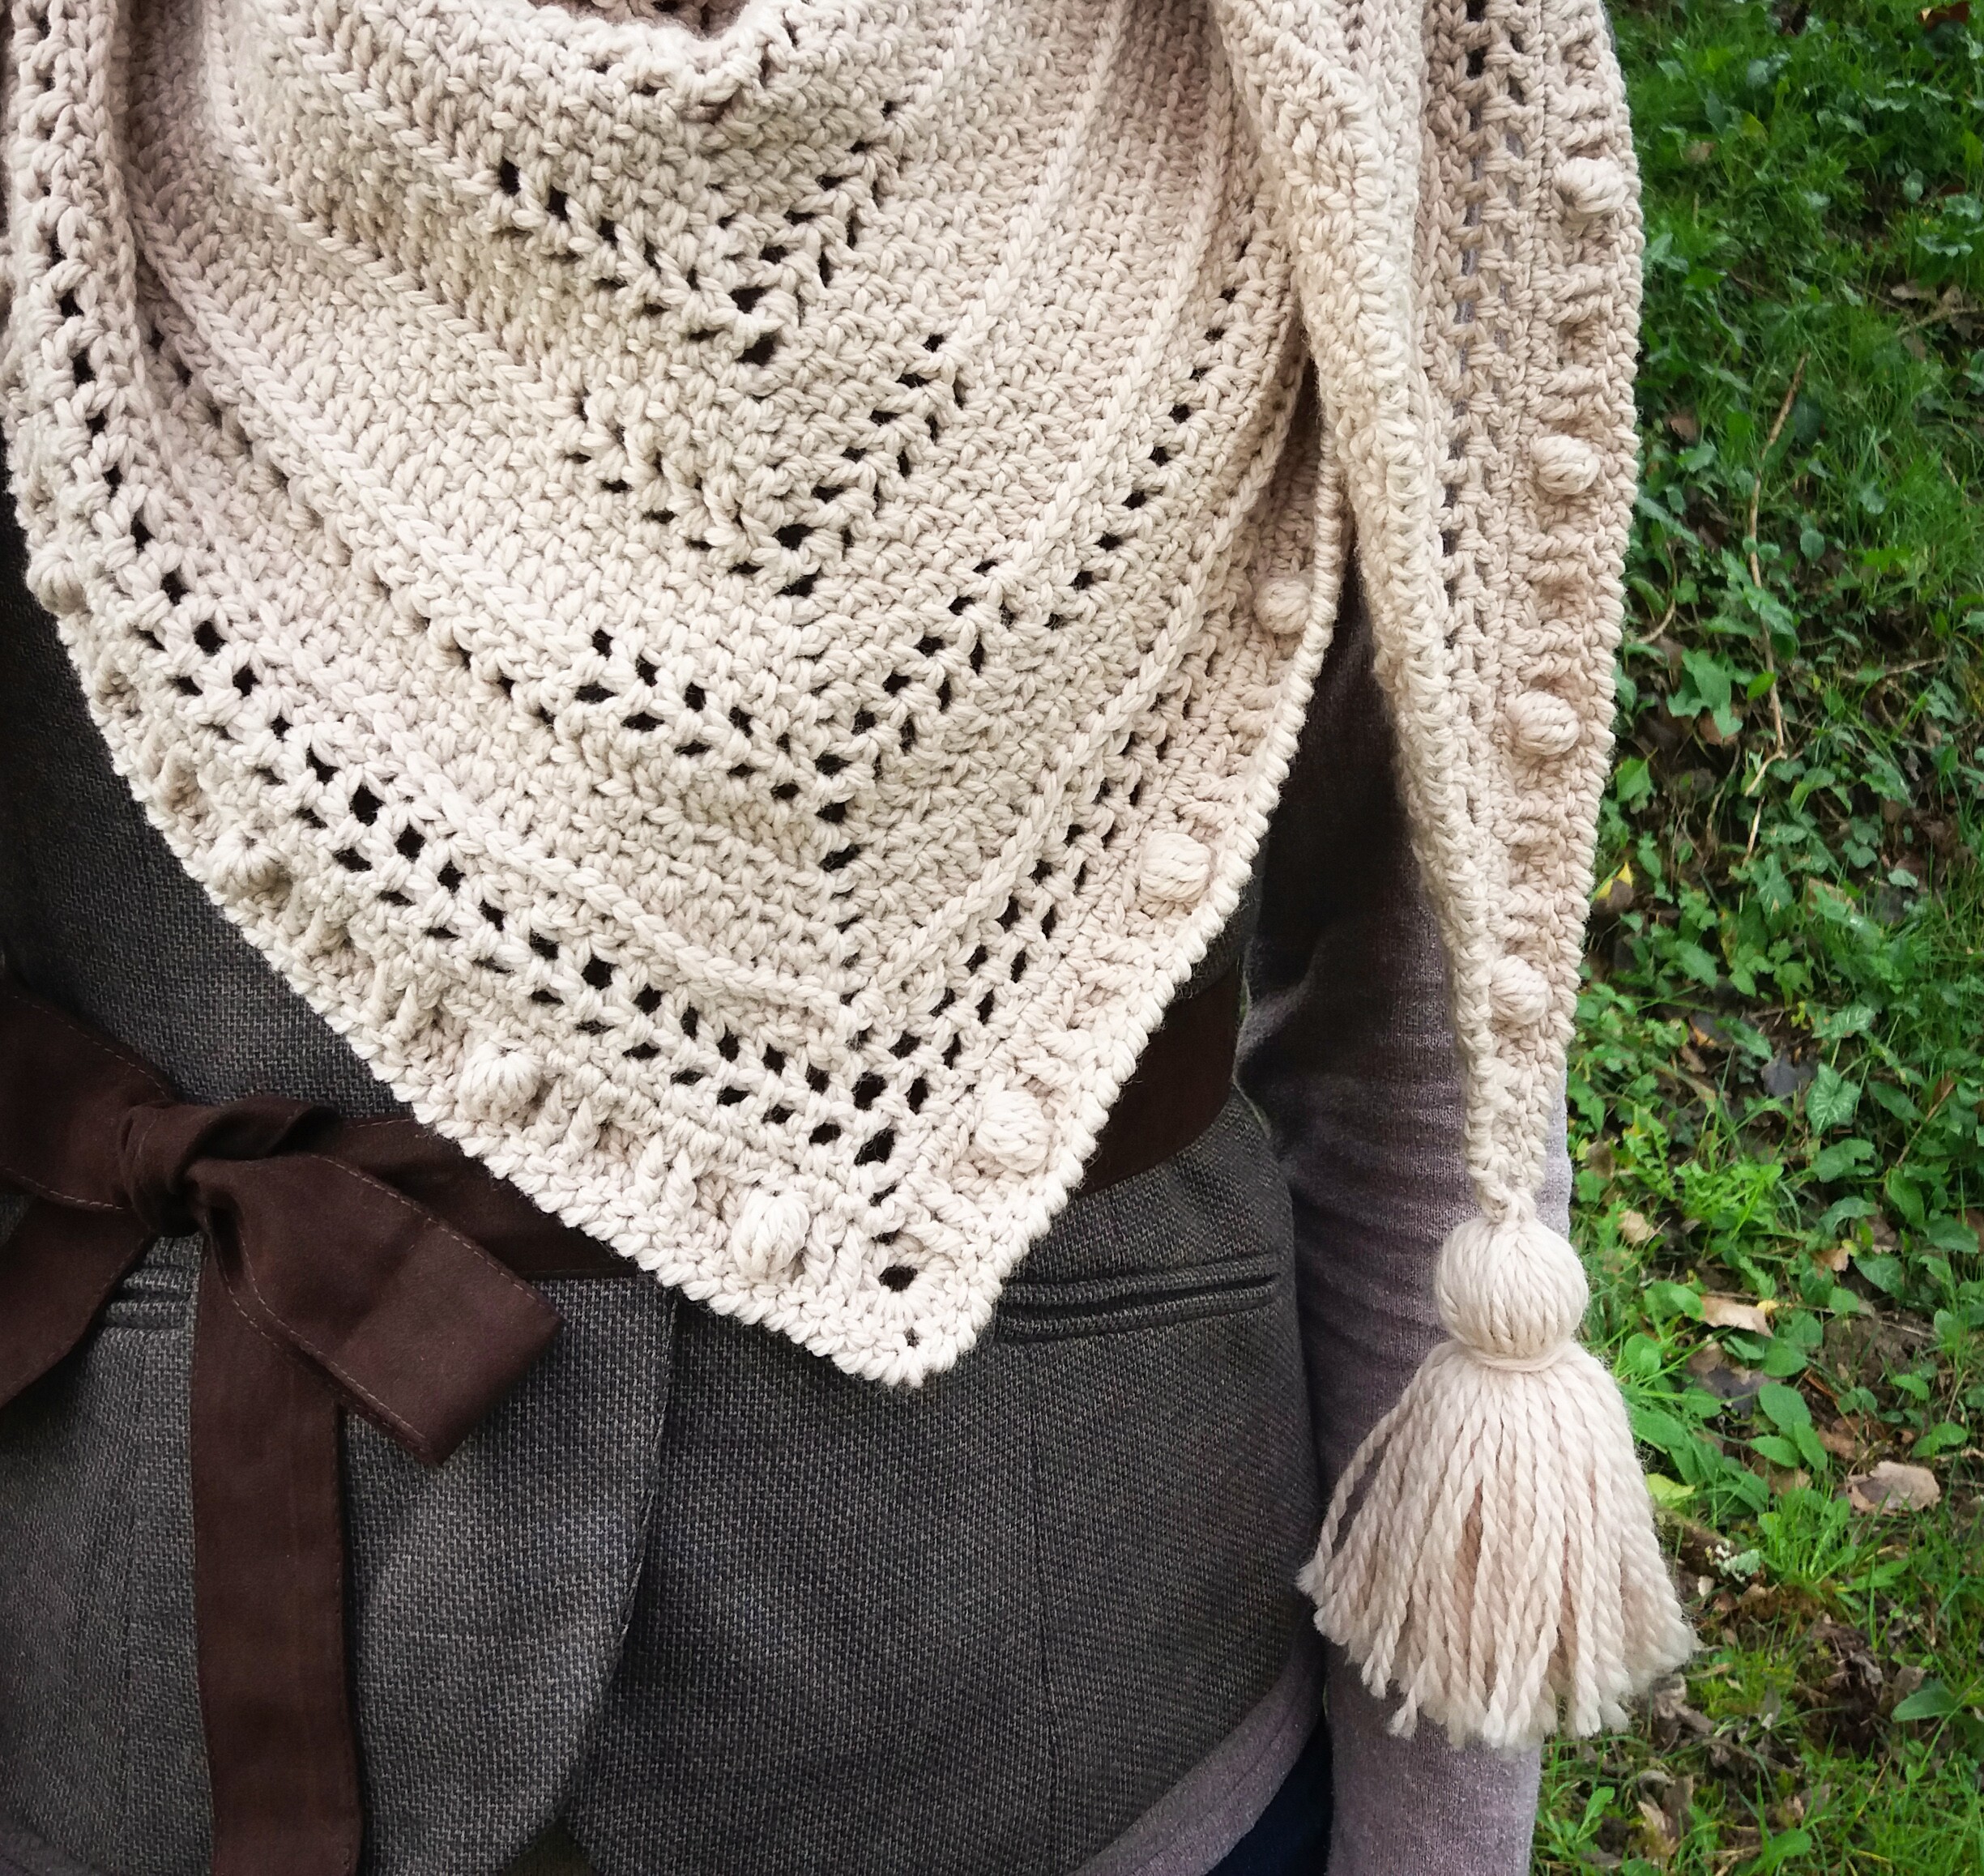
The Yarn
To make this shawl I highly recommend a solid color yarn to bring out the textures.
For this project I used Phil Ecolaine yarn from Phildar which is a Dk weight, 100% organic wool, certified GOTS (Global Organic Textile Standard), meaning it is a fiber of natural biological origin and manufactured with respect for the environment and those who make it. I am more and more sensitive to natural and ecological materials.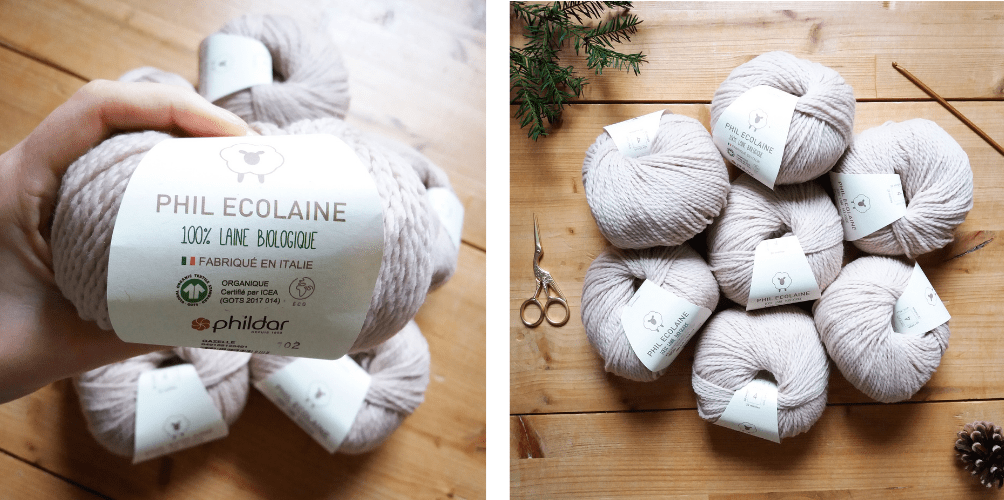
Phil Ecolaine yarn is really soft, does not scratch at all (my sensitive skin!), perfect for scarves, snoods, shawls, hats.. and offers a very pleasant texture to work with. It is a 100% sheep’s wool that has the advantage of being strong and breathable while offering a good protection against cold.
To make the Adenia shawl you will need minimum 1297 yds | 1186 meters for the shawl and 48 yds | 44 meters for the tassels = 10 balls of Phil Ecolaine.
Looking For A Substitution ?
One of my tester used the Bernat Baby Sport yarn to make the wrap.
I would also recommend the Baby Alpaca Yarn or the Superwash Merino Yarn from Lion Brand Yarn that are 100% wool too with a good gauge and yards ratio compared with the Phil Ecolaine.


The Printable Version With Visual Help
I often find that for lace crochet patterns like this triangle wrap, a stitch chart can be super helpful and make some of the written explanations quicker and easier to understand.
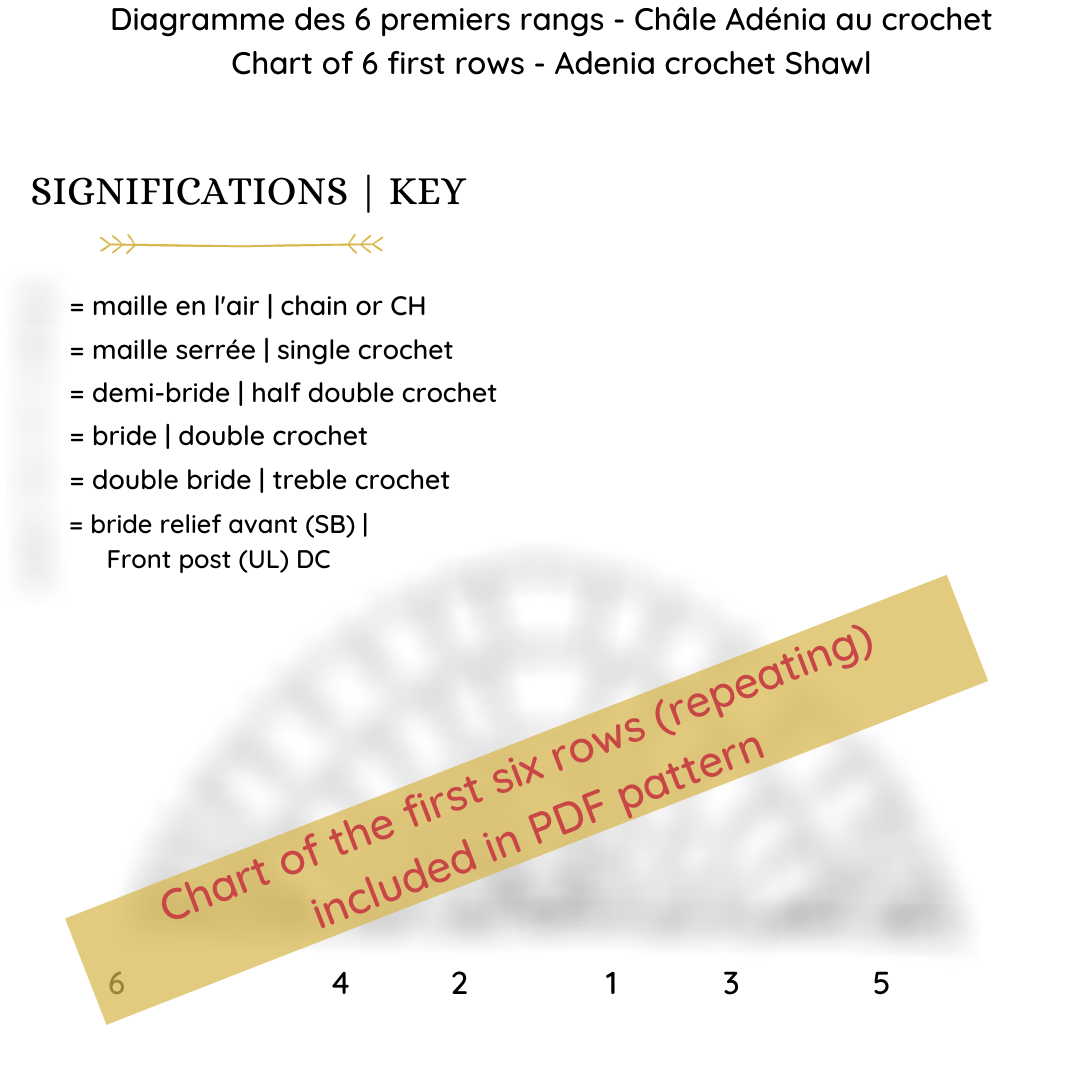
In the ad-free, printable PDF you will find a stitch chart of the first six rows (repetitive) in addition to the written pattern and tutorial photos. You can grab the printable PDF HERE on Etsy. 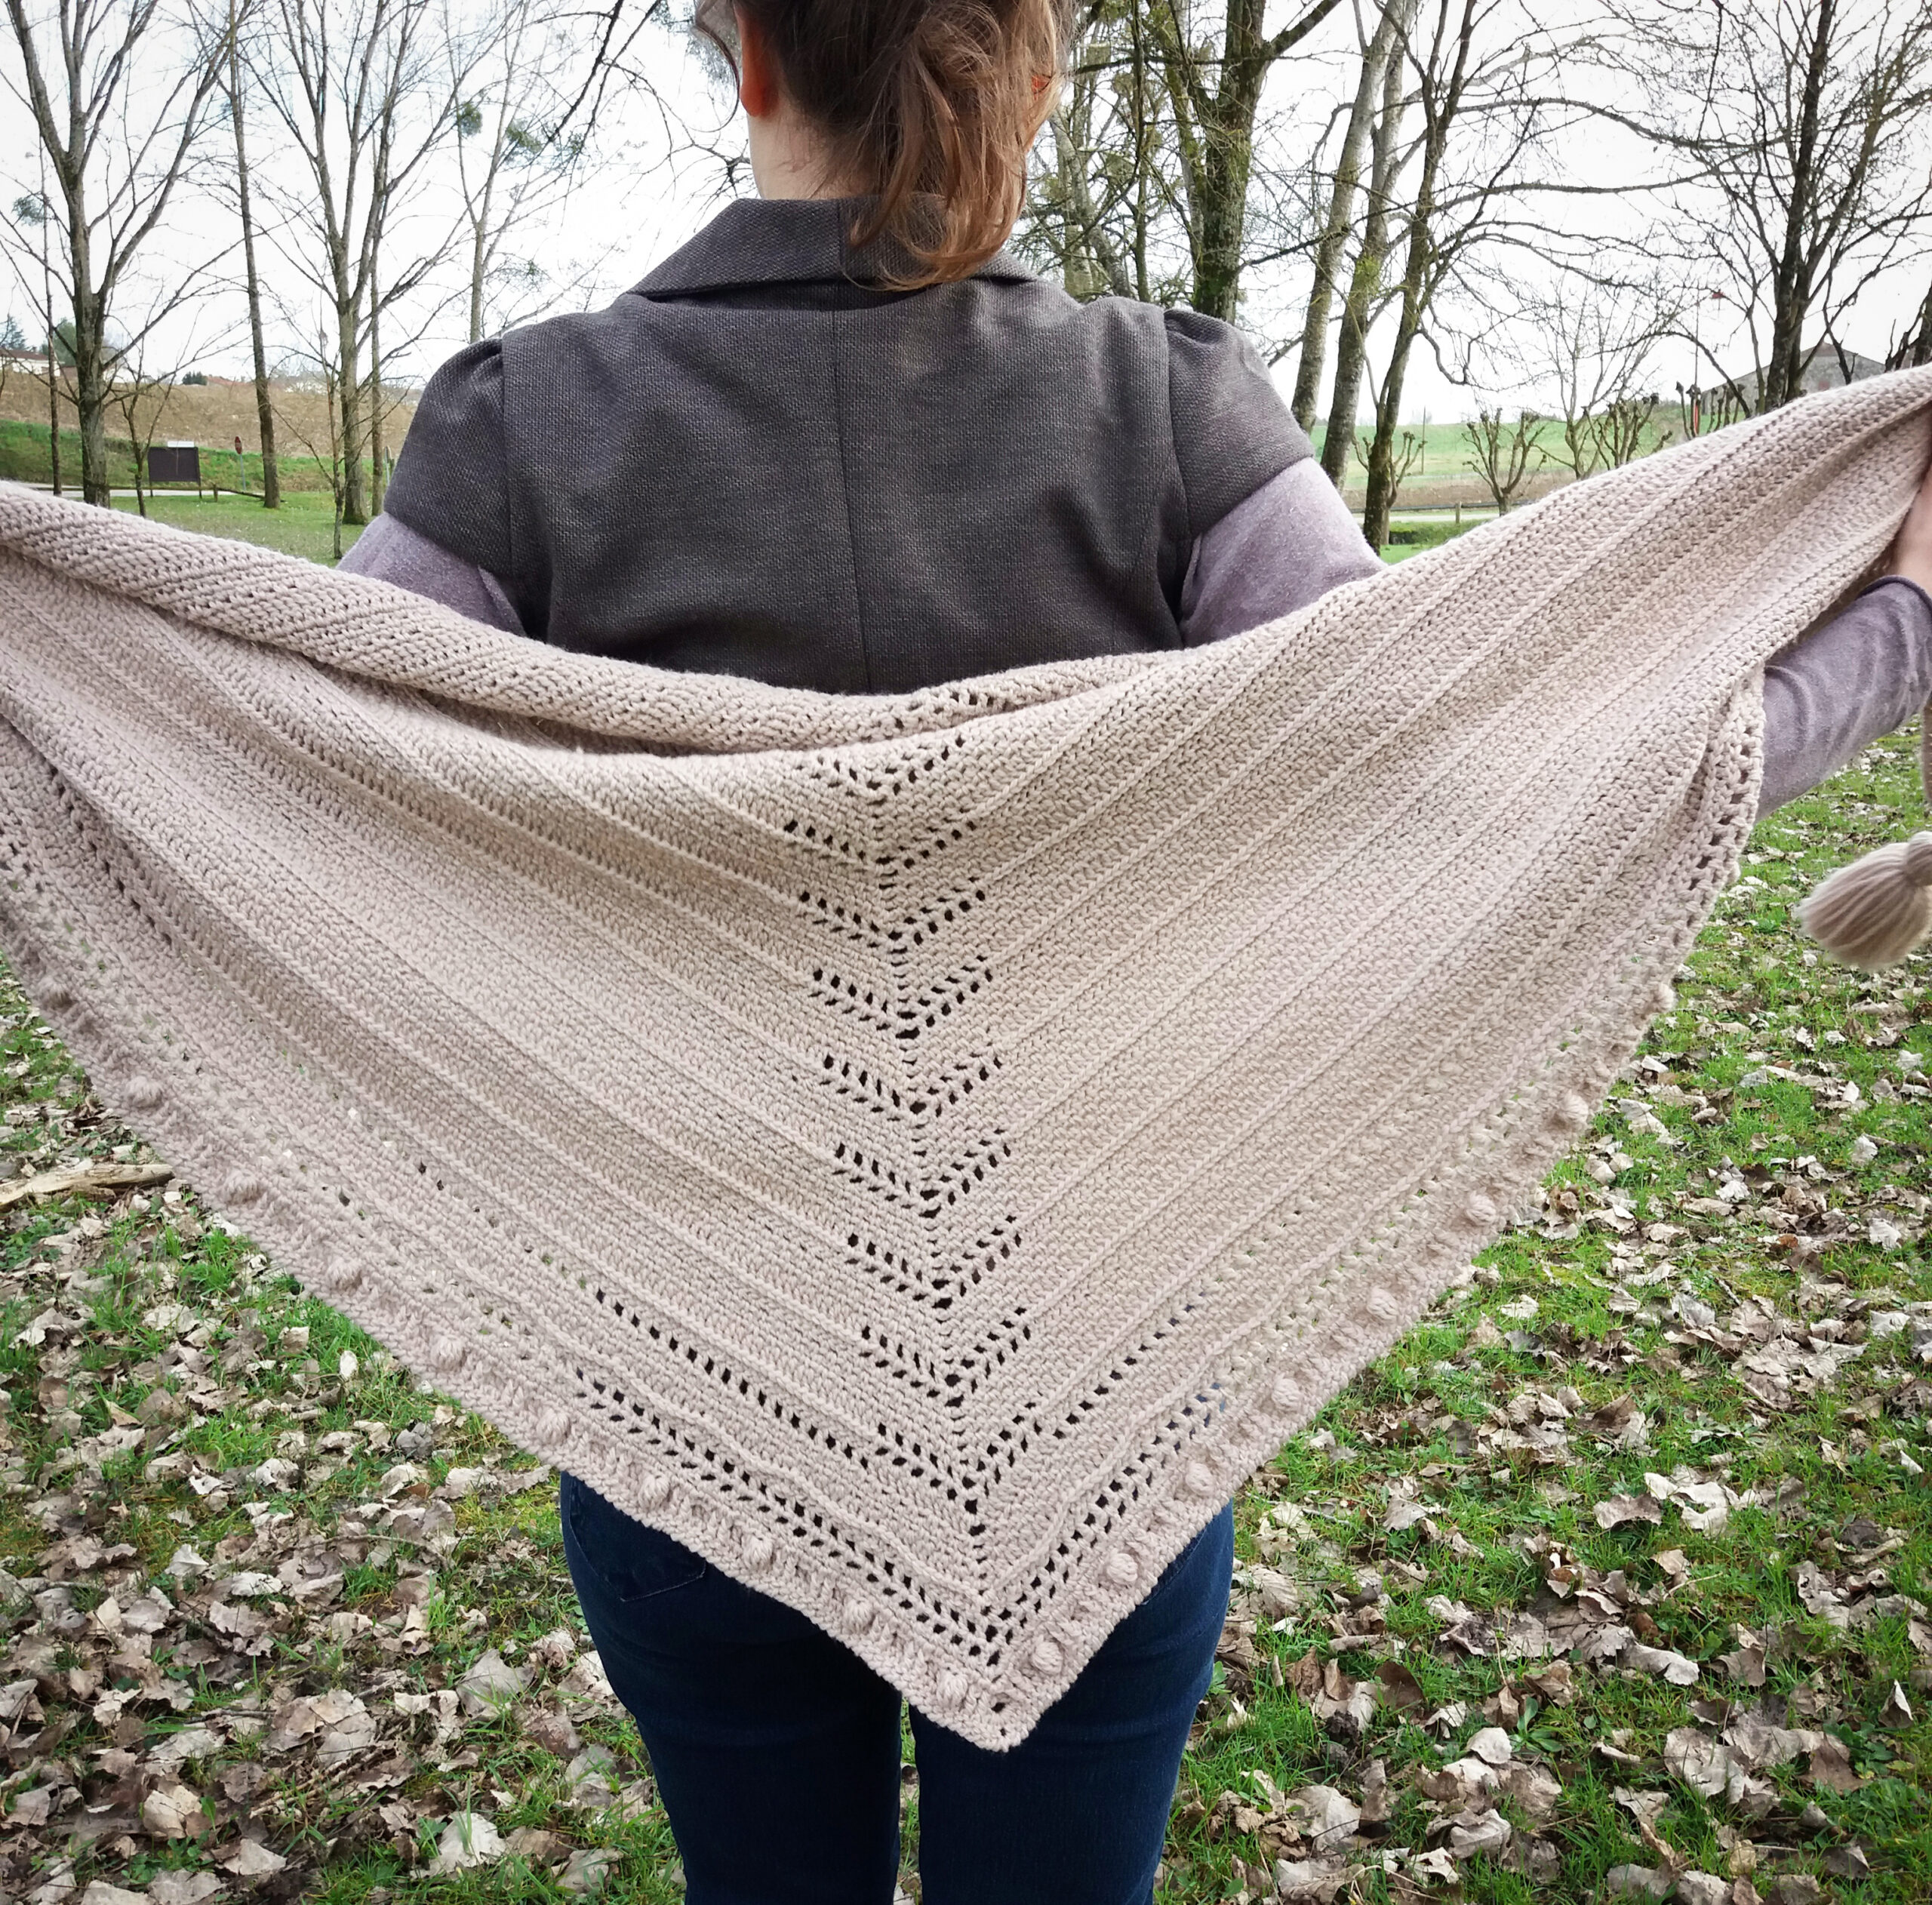
Ok, ready to make a warm boho triangle scarf ?! Grab your crochet hook and let’s do it!
ADENIA CROCHET SHAWL WRAP
- Purchase the ad-free, printable PDF with stitch chart of the six first rows and yarn tassels tutorial HERE on LoveCrafts or HERE on Etsy.
- Add this pattern to your Ravelry queue HERE.
- PIN IT to your Pinterest boards for later HERE.
Description
The Adenia shawl is worked from the top down with increases in the chain stitches in the middle and at the ends. It consists of a main fabric with thirteen repetitions in total of: four rows in moss stitch (alternating ch, sc) and two rows of front post double crochet & central eyelets in arrow shape. Then a fancy edge in eyelets and various textured stitches including the bobbles and front post DC. The last row is a crab stitch finish providing a twisted cording edge.
Finished Dimensions (excluding tassels)
Wide (A): 74”/188 cm x Depth (B): 29”/74 cm. Length (C): 44”/112 cm.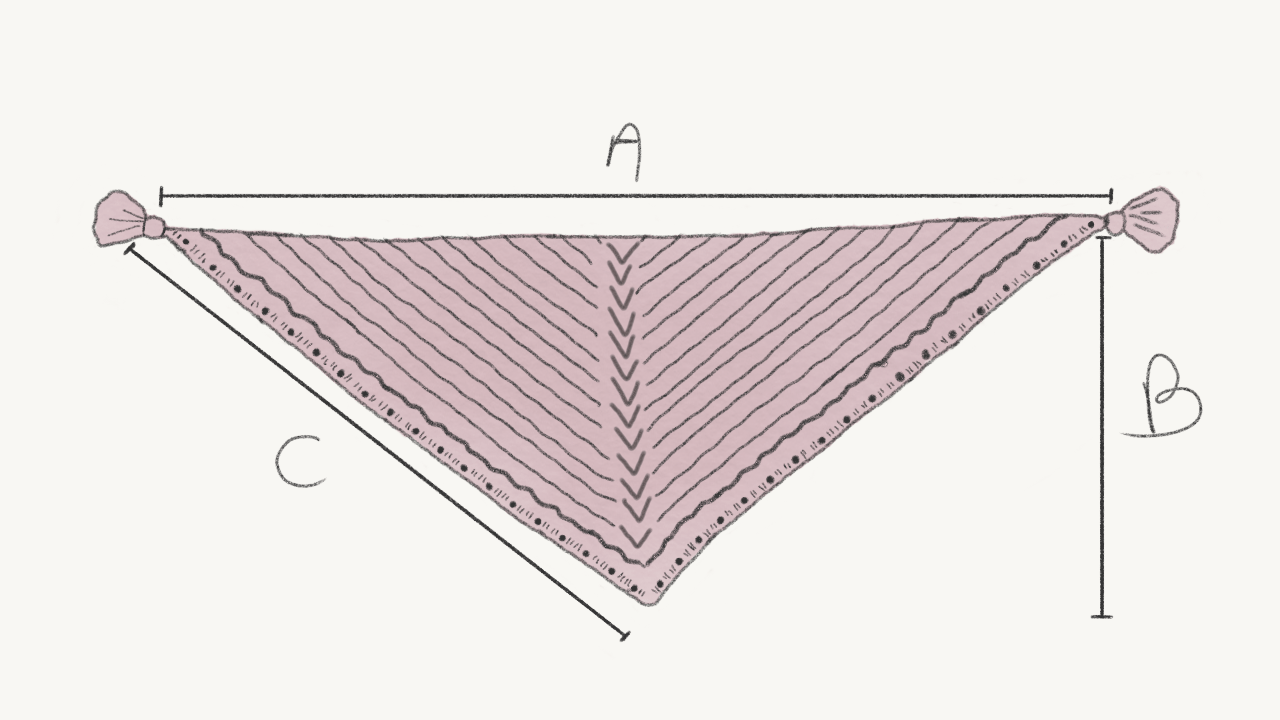
Level
Easy – Intermediate
Yarn
– Phil Ecolaine from Phildar (Dk ~ 137 yds/125 m = 50 g) | Color: Gazelle
↠ 1297 yds/1186 meters (shawl) + 48 yds/44 meters (tassels) = 10 balls.
Notions
↠ Scissors
↠ 4.8”/12 cm cardboard sheet for the tassels

Gauge (4”/10 x 10 cm)
17 sc x 22 rows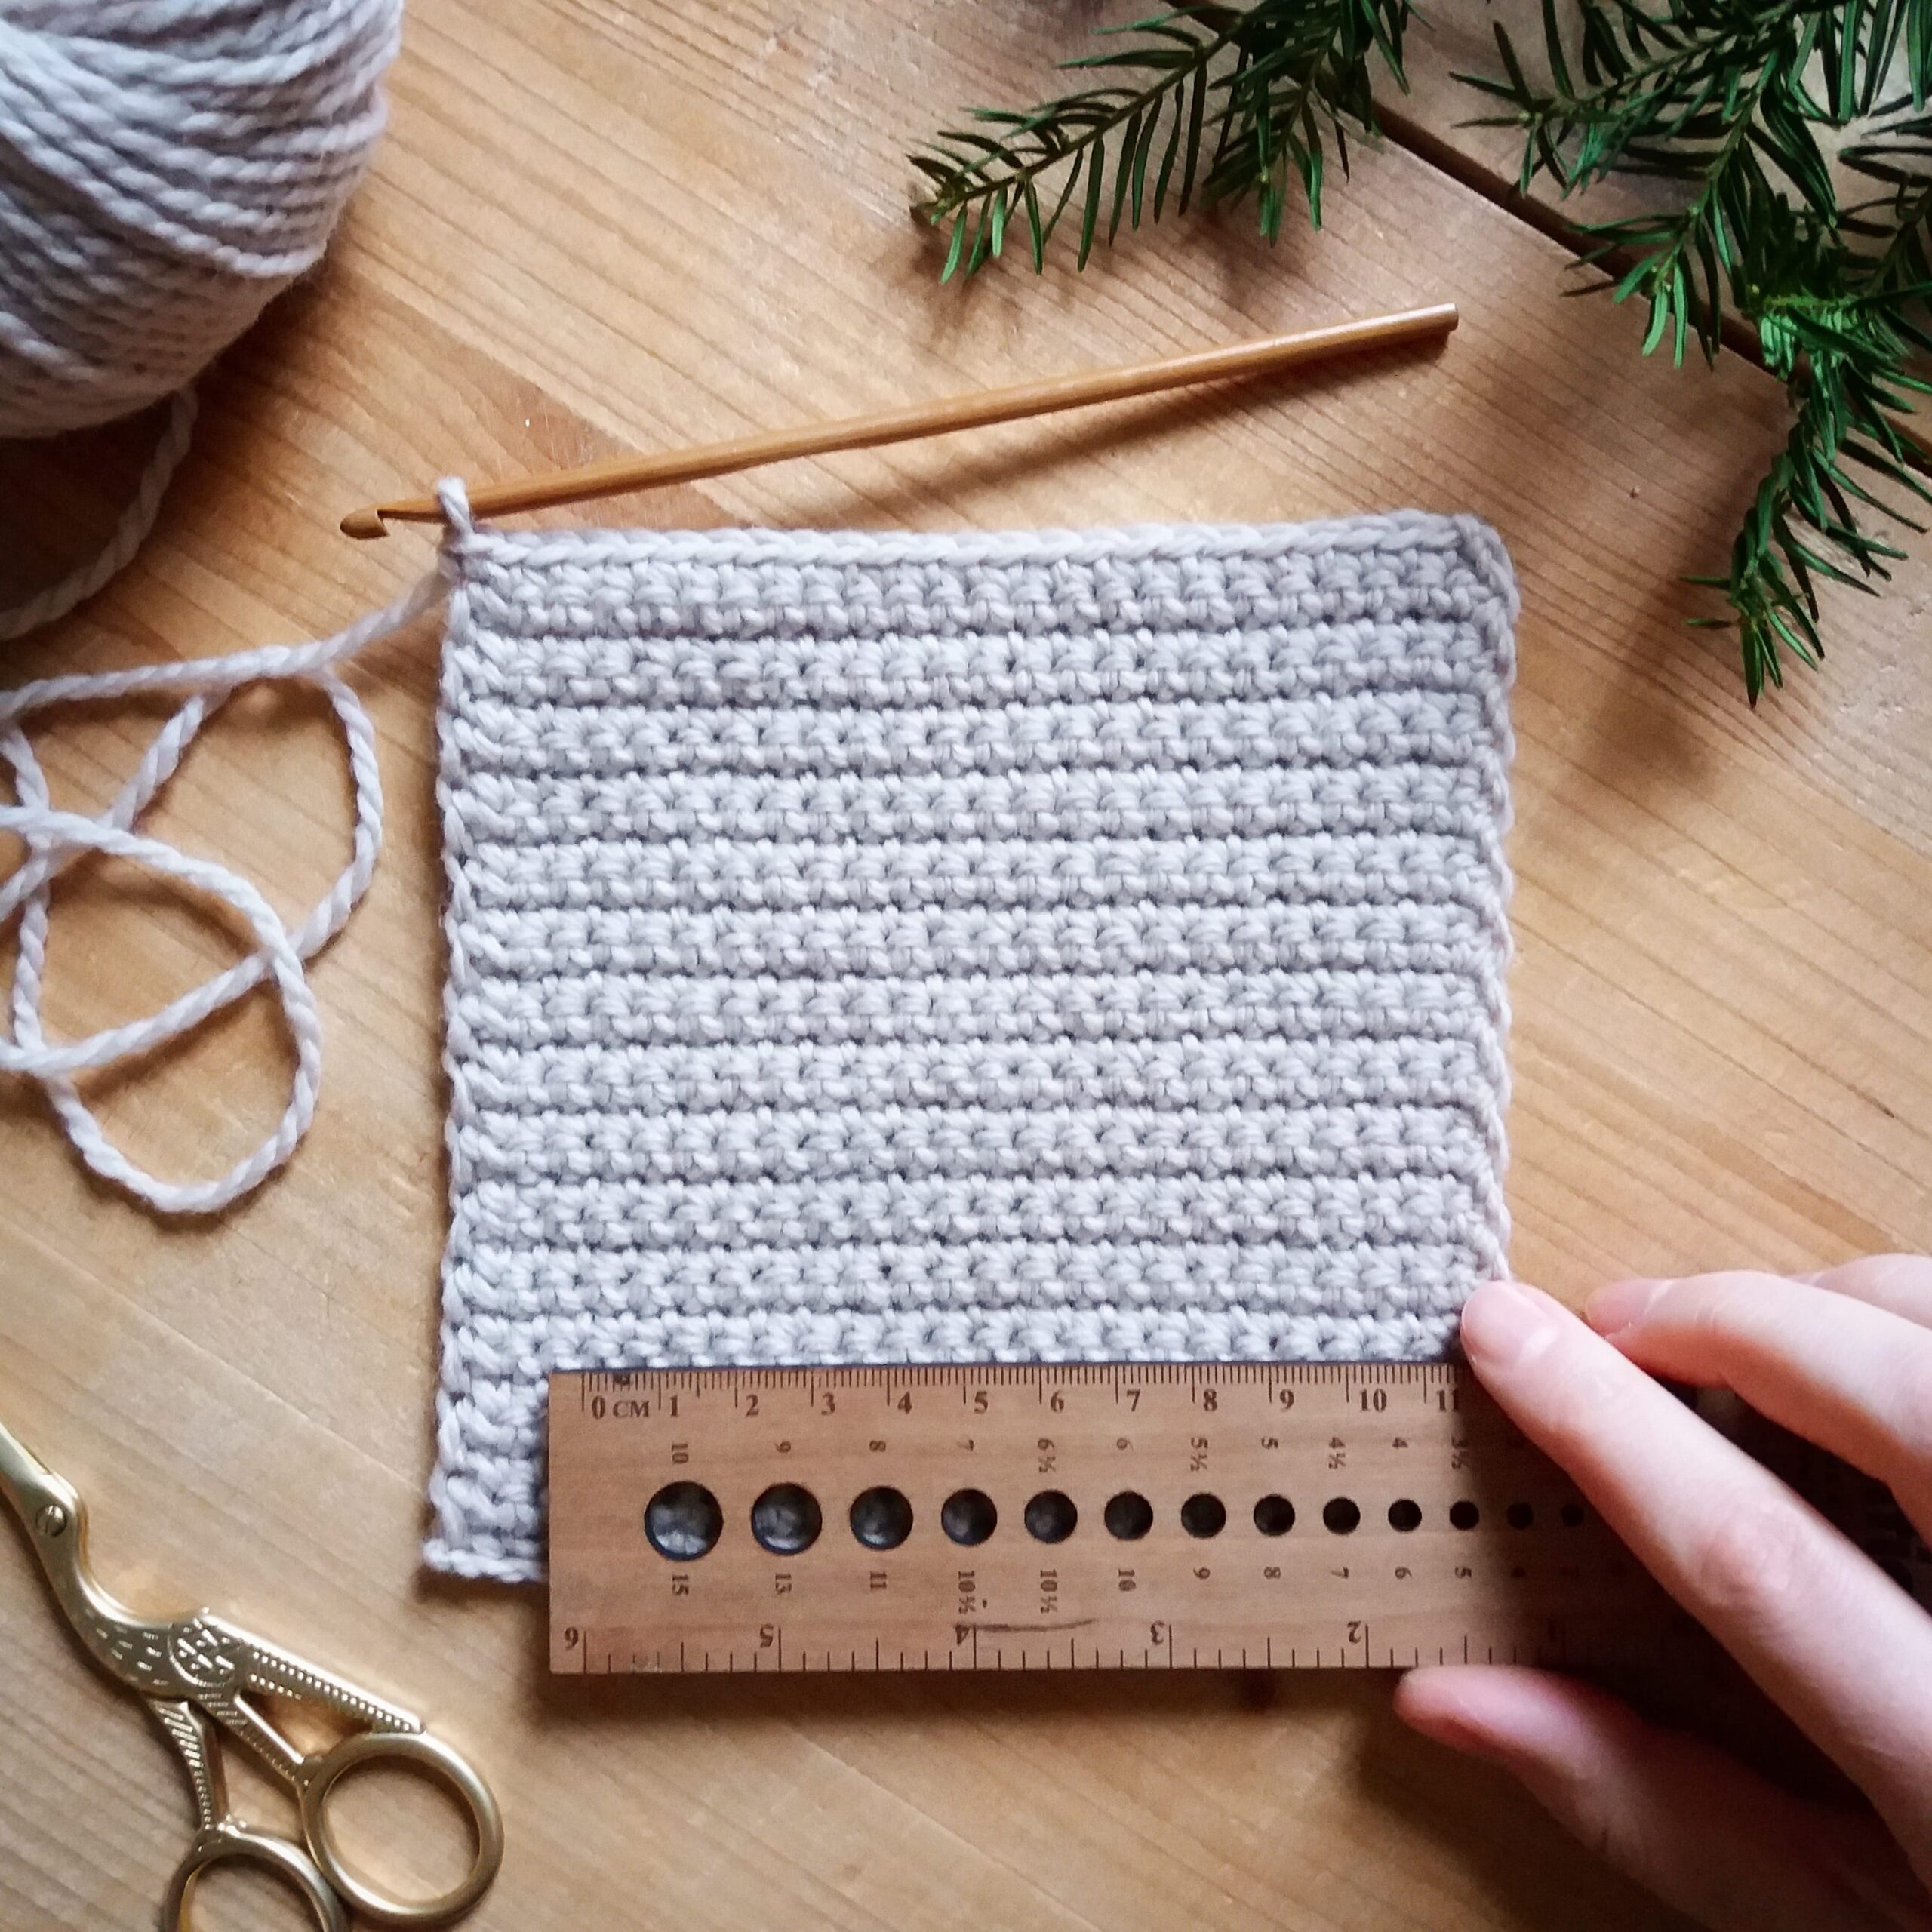
Abreviations (US Terms)
st(s): stitch(es) | ch: chain | sl st: slip stitch | sc: single crochet | hdc: half double crochet | dc: double crochet | tr: treble crochet | FP: Front Post | UL: Under Loops | BP: Back Post | prev : previous
Stitches Used
FP : Work the indicated stitch by inserting the hook from the front to the back at right of the next stitch, and bring it out at left of the same stitch. The hook is now round of the stem of the stitch.
(UL): Make the indicated stitch in front post but instead of inserting the hook in the middle of the stitch as normal, it must be inserted just under the upper loops, between the two stitches (photos below).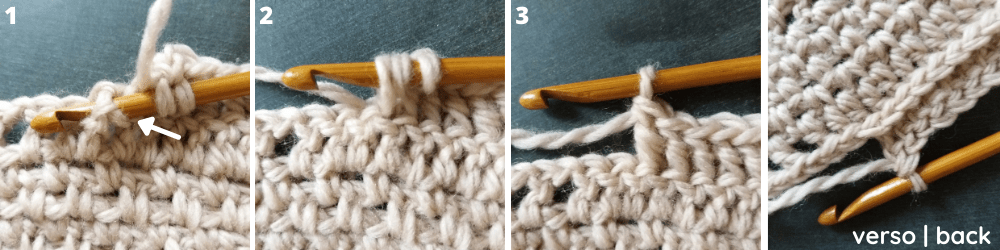
Front Post (Under Loops) Double Crochet video tutorial :
BP : Work the indicated stitch by inserting the hook from the back through the front at right of the next stitch, and through to the back again at left of the same stitch.
Bobble : Make 7 DC in one stitch: * wrap the yarn over the hook, insert the hook where required, pull a loop through, wrap the yarn over the hook, pull through the first two loops * repeat from * to * six more times in the same place. Wrap the yarn over the hook, and pull through all loops. Work one chain to close (photos below)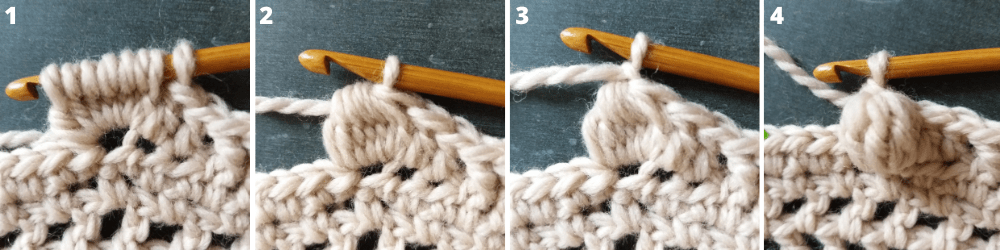
Crab stitch : single crochet worked in reverse. Right-handed: from left to right, left-handed: from right to left. (photos below)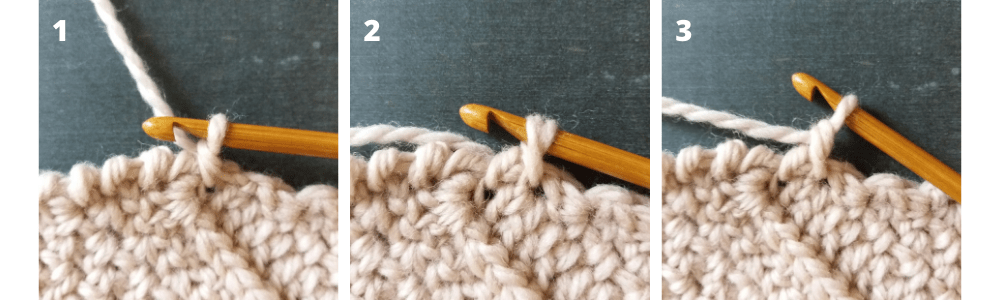
Notes
– The ch at beginning of each row counts as one st.
– The sts between [ ] are the stitches in the middle corner, always crocheted in the middle ch of the previous row.
– Remember to keep a normal tension by crocheting the ch1 of the moss stitch (4 first rows repeated).
– The chart of the first six (repeated) rows is at the end of the pattern.
– The full free tutorial to make the yarn tassels is HERE.
Want some company while you crochet?
Get support and share your wips in the Fibre and Folk Facebook Group HERE.
PATTERN
Foundation round: Ch 4, sl st to first ch to join. Ring formed.
Row 1 : ch 2, 1 sc, ch 1, [ 1 sc, ch 3, 1 sc ], ch 1, 1 sc, 1 hdc, turn. (= 11 sts)
Row 2 : ch 2, 1 sc in last st of prev row, ch 1, skip next st, 1 sc in ch 1, ch 1, skip next st, [ 1 sc, ch 3, 1 sc ] in ch 3 of prev row, ch 1, skip next st, 1 sc in ch 1, ch 1, skip next st, 1 sc + 1 hdc between last st and ch of the prev row, turn. (= 15 sts)
➳ row 2: Place one stitch marker M1 in 2nd sc between brackets, and M2 in first sc of the row. Move markers up as each row is worked.

Row 3 : ch 2, 1 sc in last st of prev row, * ch 1, skip next st, 1 sc in ch of prev row *, repeat from * to * until M1, ch 1, skip next st, [ 1 sc, ch 3, 1 sc ], * ch 1, skip next st, 1 sc in ch of prev row, * repeat from * to * until M2, ch 1, skip next st, 1 sc + 1 hdc between last st and ch of the prev row, turn. (= 19 sts)
Row 4 : ch 2, 1 sc in last st of prev row, * ch 1, skip next st, 1 sc *, repeat from * to * until M1, ch 1, skip next st, [ 1 sc, ch 3, 1 sc ], * ch 1, skip next st, 1 sc *, repeat from * to * until M2, ch 1, skip next st, 1 sc + 1 hdc between last st and ch of the prev row, turn. (= 23 sts)
➳ row 4: Place one stitch marker M3 in the 8th st after the 2nd sc between brackets (keeping M1 and M2.)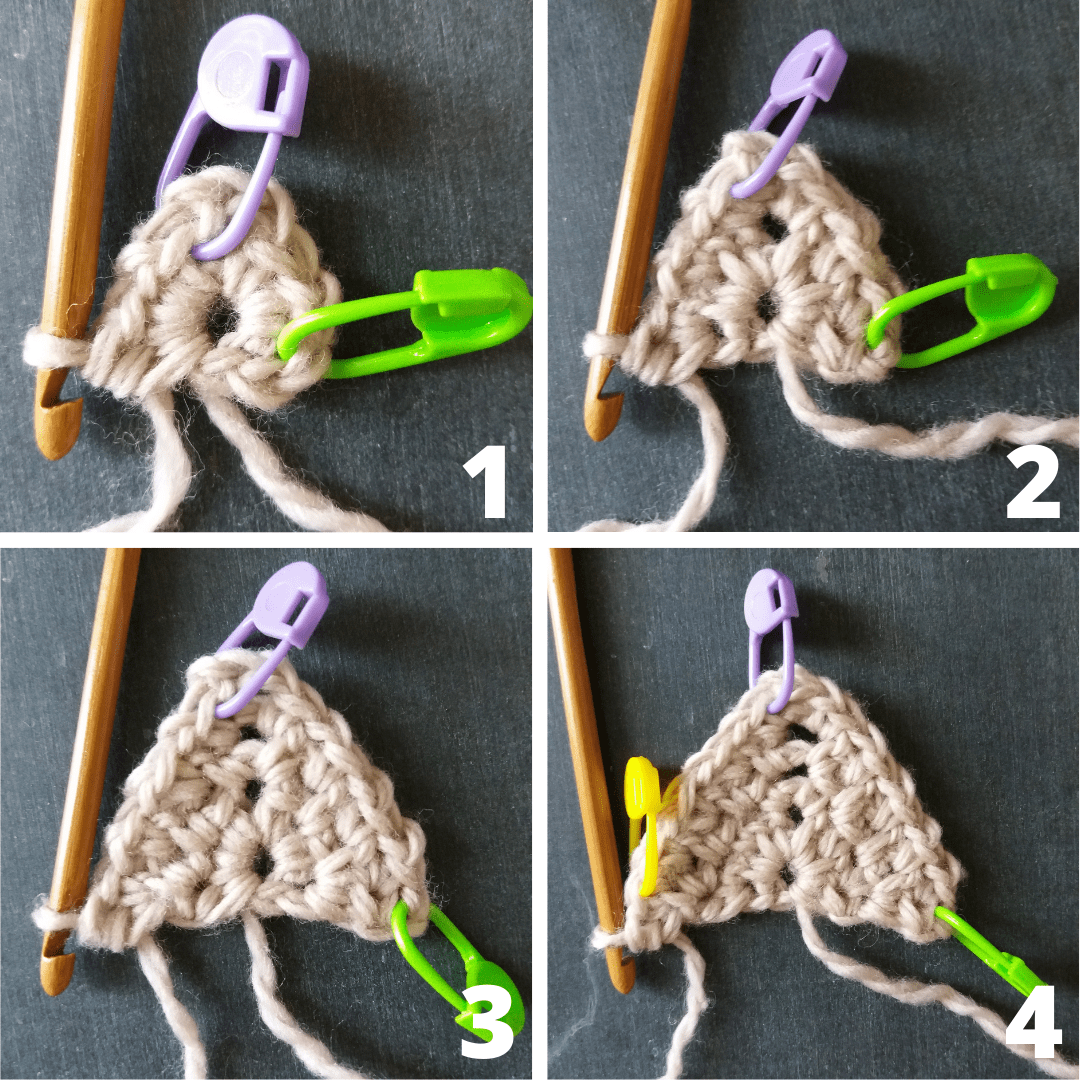

Row 5 : ch 4, 2 dc in last st of prev row, dc until M3, * ch 1, skip next st, 1 dc *, repeat from * to * until M1, ch 1, [ 1 dc, ch 3, 1 dc ], * ch 1, skip next st, 1 dc *, repeat from * to * five times in total, dc until M2, 2 dc + 1 tr between last st and ch of the prev row, turn. (= 29 sts)
Row 6 : ch 4, 2 dc in last st of prev row, FP(UL) dc until M3, * ch 1, skip next st, 1 dc *, repeat from * to * until M1, ch 1, [ 1 dc, ch 3, 1 dc ], * ch 1, skip next st, 1 dc *, repeat from * to * five more times in total, FP(UL) dc until M2, 2 dc + 1 tr between last st and ch of the prev row, turn. (= 35 sts)
➳ row 6: Remove the marker M3.


Row 7 – 10 : Repeat row 4. (Row 10 = 51 sts)
Row 11 : Repeat row 5. (= 57 sts)
Row 12 : Repeat row 6. (= 63 sts)
➳ Repeat row 7 to row 12 : ELEVEN more times. ( Row 78 = 371 sts )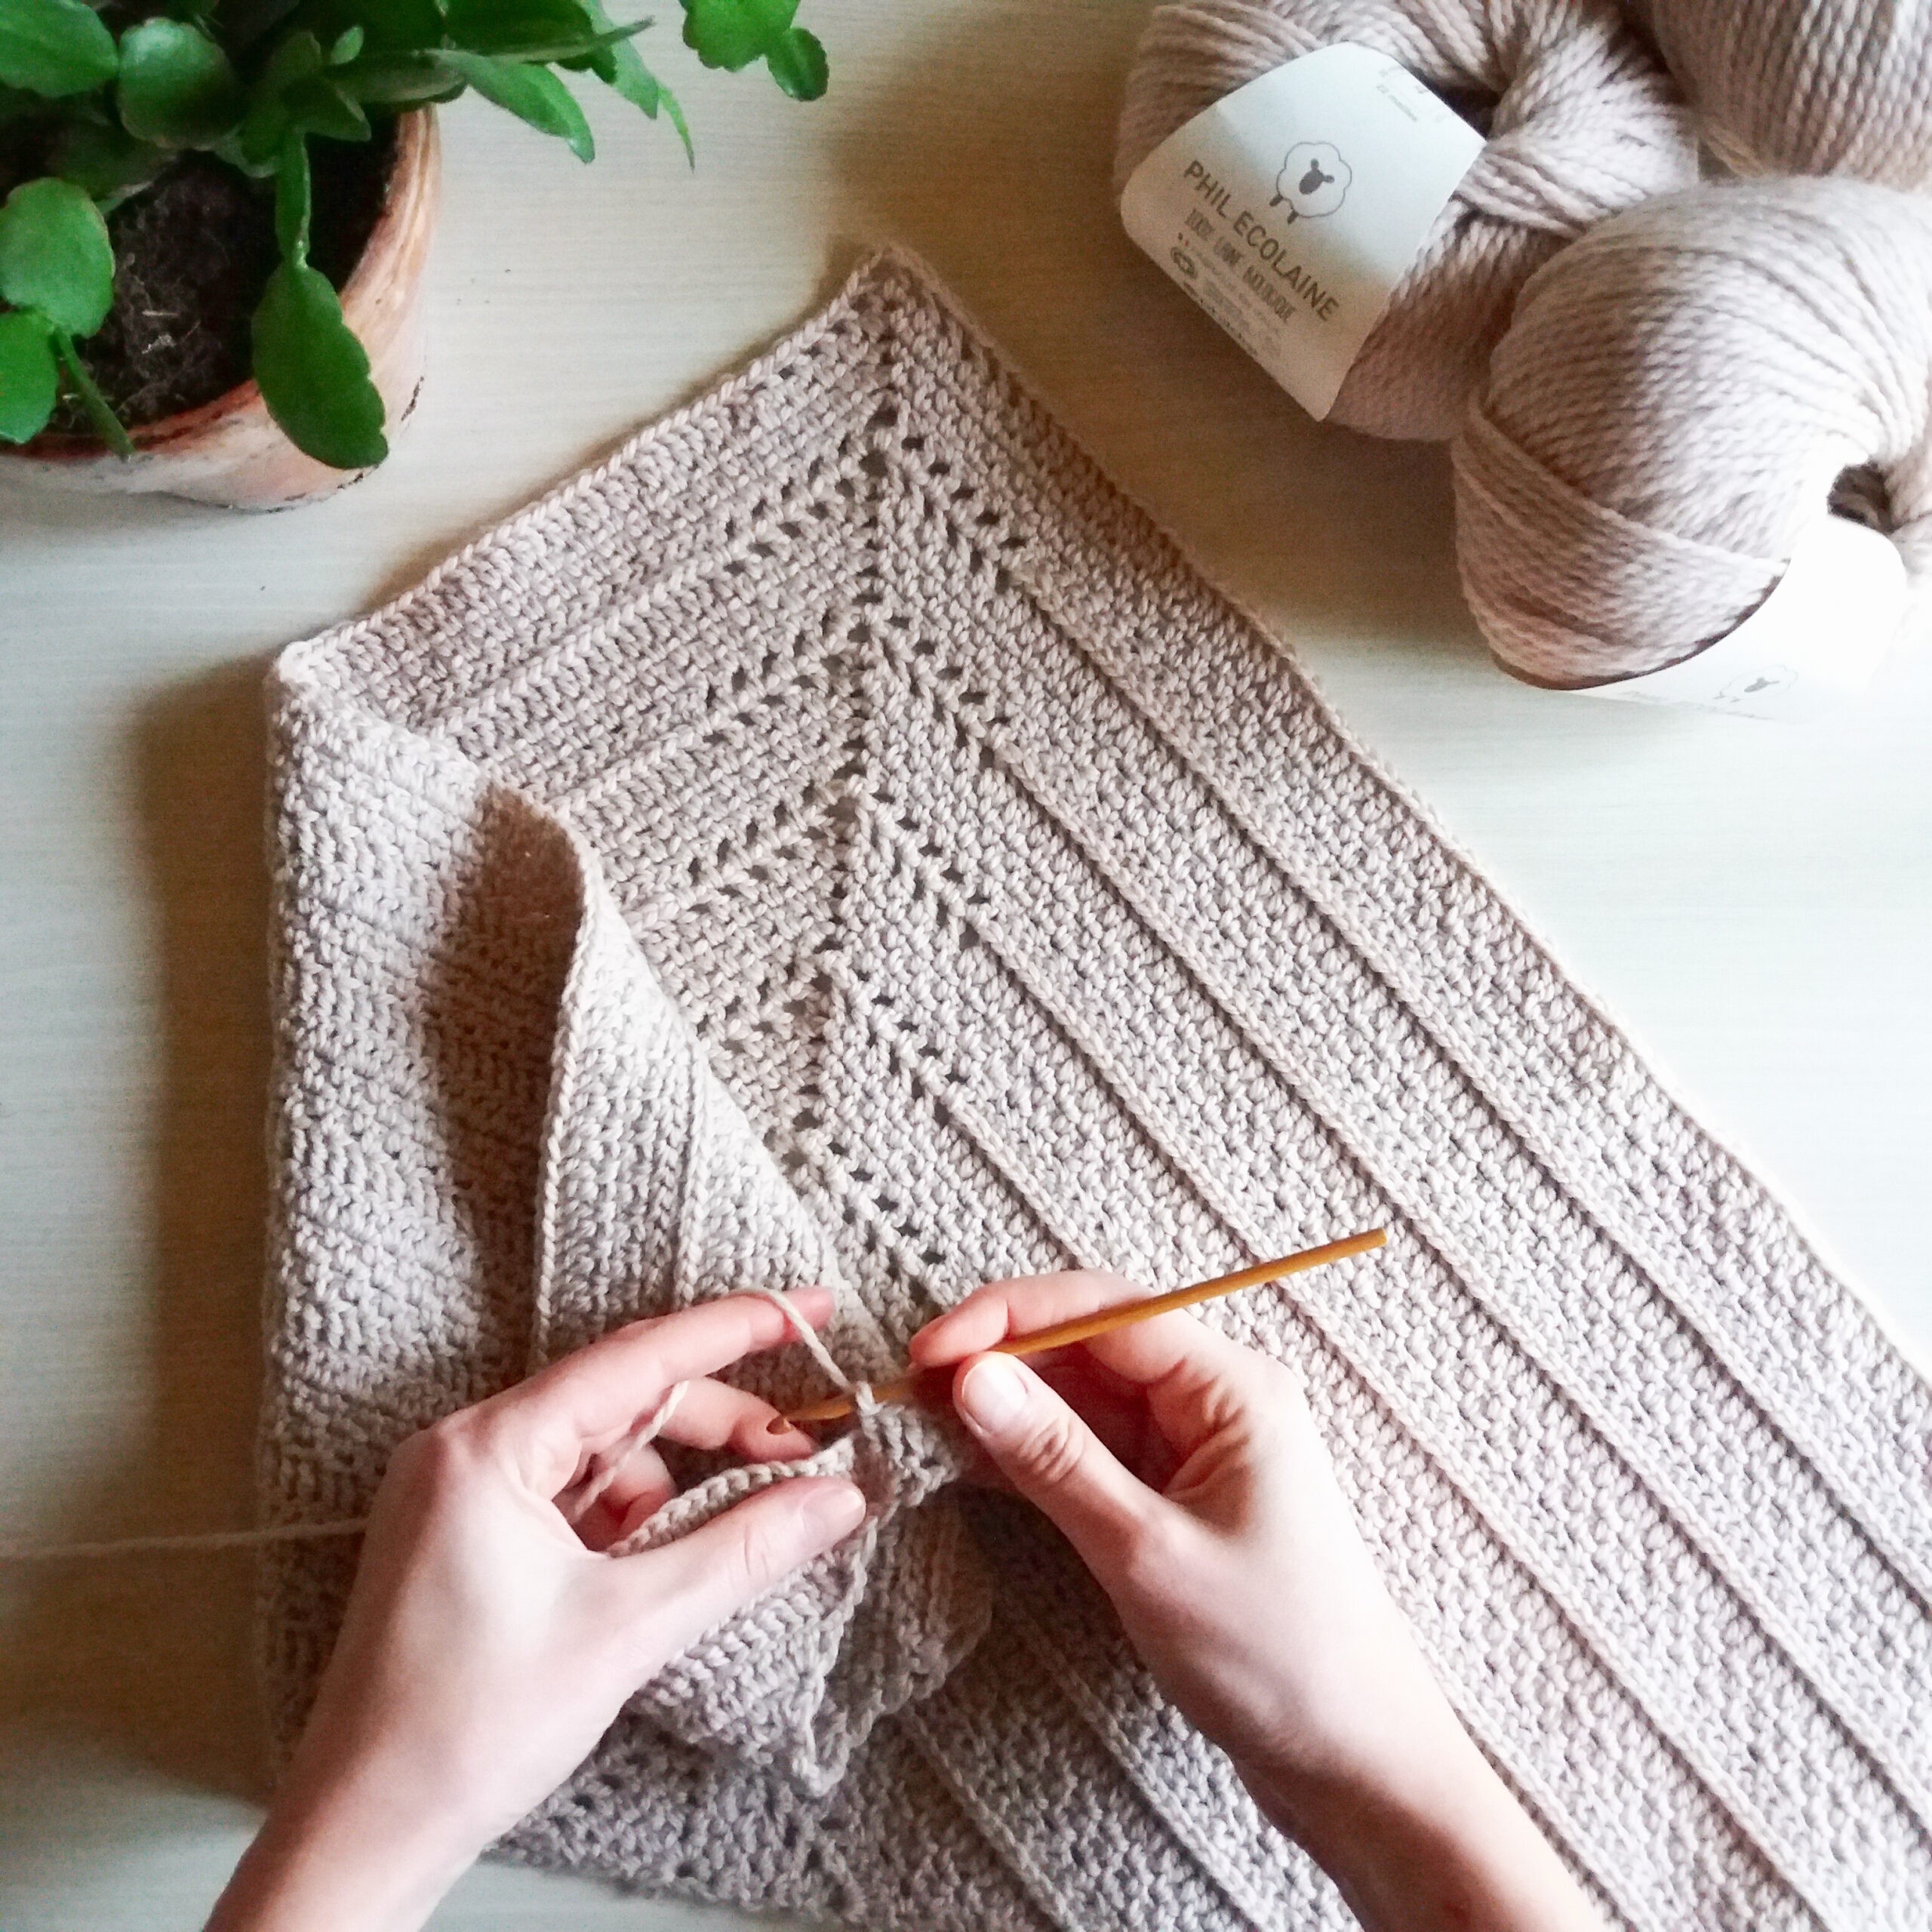
➳ row 78: Keep the three markers in place.
FANCY EDGE
Row 79 : ch 4, 2 dc in last st of prev row, * ch 1, skip next st, 1 dc *, repeat from * to * until M3, ch 1, skip next st, 1 dc in each st until M1, 1 dc [ 1 dc, ch 3, 1 dc ], 10 dc, * ch 1, skip next st, 1 dc *, repeat from * to * until M2, ch 1, skip next st, 2 dc + 1 tr between last st and ch of the prev row, turn. (= 377 sts)
➳ row 79: Remove the marker M3.
Row 80 : ch 2, 1 sc in last st of prev row, 1 sc, * ch 1, skip next st, 1 sc *, repeat from * to * until M1, ch 1, skip next st, [ 1 sc, ch 3, 1 sc ], * ch 1, skip next st, 1 sc *, repeat from * to * until M2, 1 sc + 1 hdc between last st and ch of the prev row,
turn. (= 381 sts)
Row 81 : ch 2, 1 sc in last st of prev row, 1 sc, * ch 1, skip next st, 1 sc *, repeat from * to * until M1, ch 1, skip next st, [ 1 sc, ch 3, 1 sc ], * ch 1, skip next st, 1 sc *, repeat from * to * until M2, 1 sc + 1 hdc between last st and ch of the prev row,
turn. (= 385 sts)
Row 82 : ch 2, 1 sc in last st of prev row, 1 sc, * ch 1, skip next st, 1 sc *, repeat from * to * until M1, ch 1, skip next st, [ 1 sc, ch 3, 1 sc ], * ch 1, skip next st, 1 sc *, repeat from * to * until M2, 1 sc + 1 hdc between last st and ch of the prev row, turn. (= 389 sts)

Row 83 : ch 4, 1 dc + 1 hdc in last st of prev row, 1 hdc, 1 sc, * 1 hdc, 1 hdc, 1 dc, 1 dc, 1 tr, 1 dc, 1 dc, 1 hdc, 1 hdc, 1 sc * repeat from * to * until M1, [ 1 sc, ch 3, 1 sc ], * 1 sc, 1 hdc, 1 hdc, 1 dc, 1 dc, 1 tr, 1 dc, 1 dc, 1 hdc, 1 hdc * repeat from * to * until M2 (end with 1 sc, 1 hdc) , 1 hdc + 1 dc + 1 tr between last st and ch of the prev row, turn. (= 395 sts)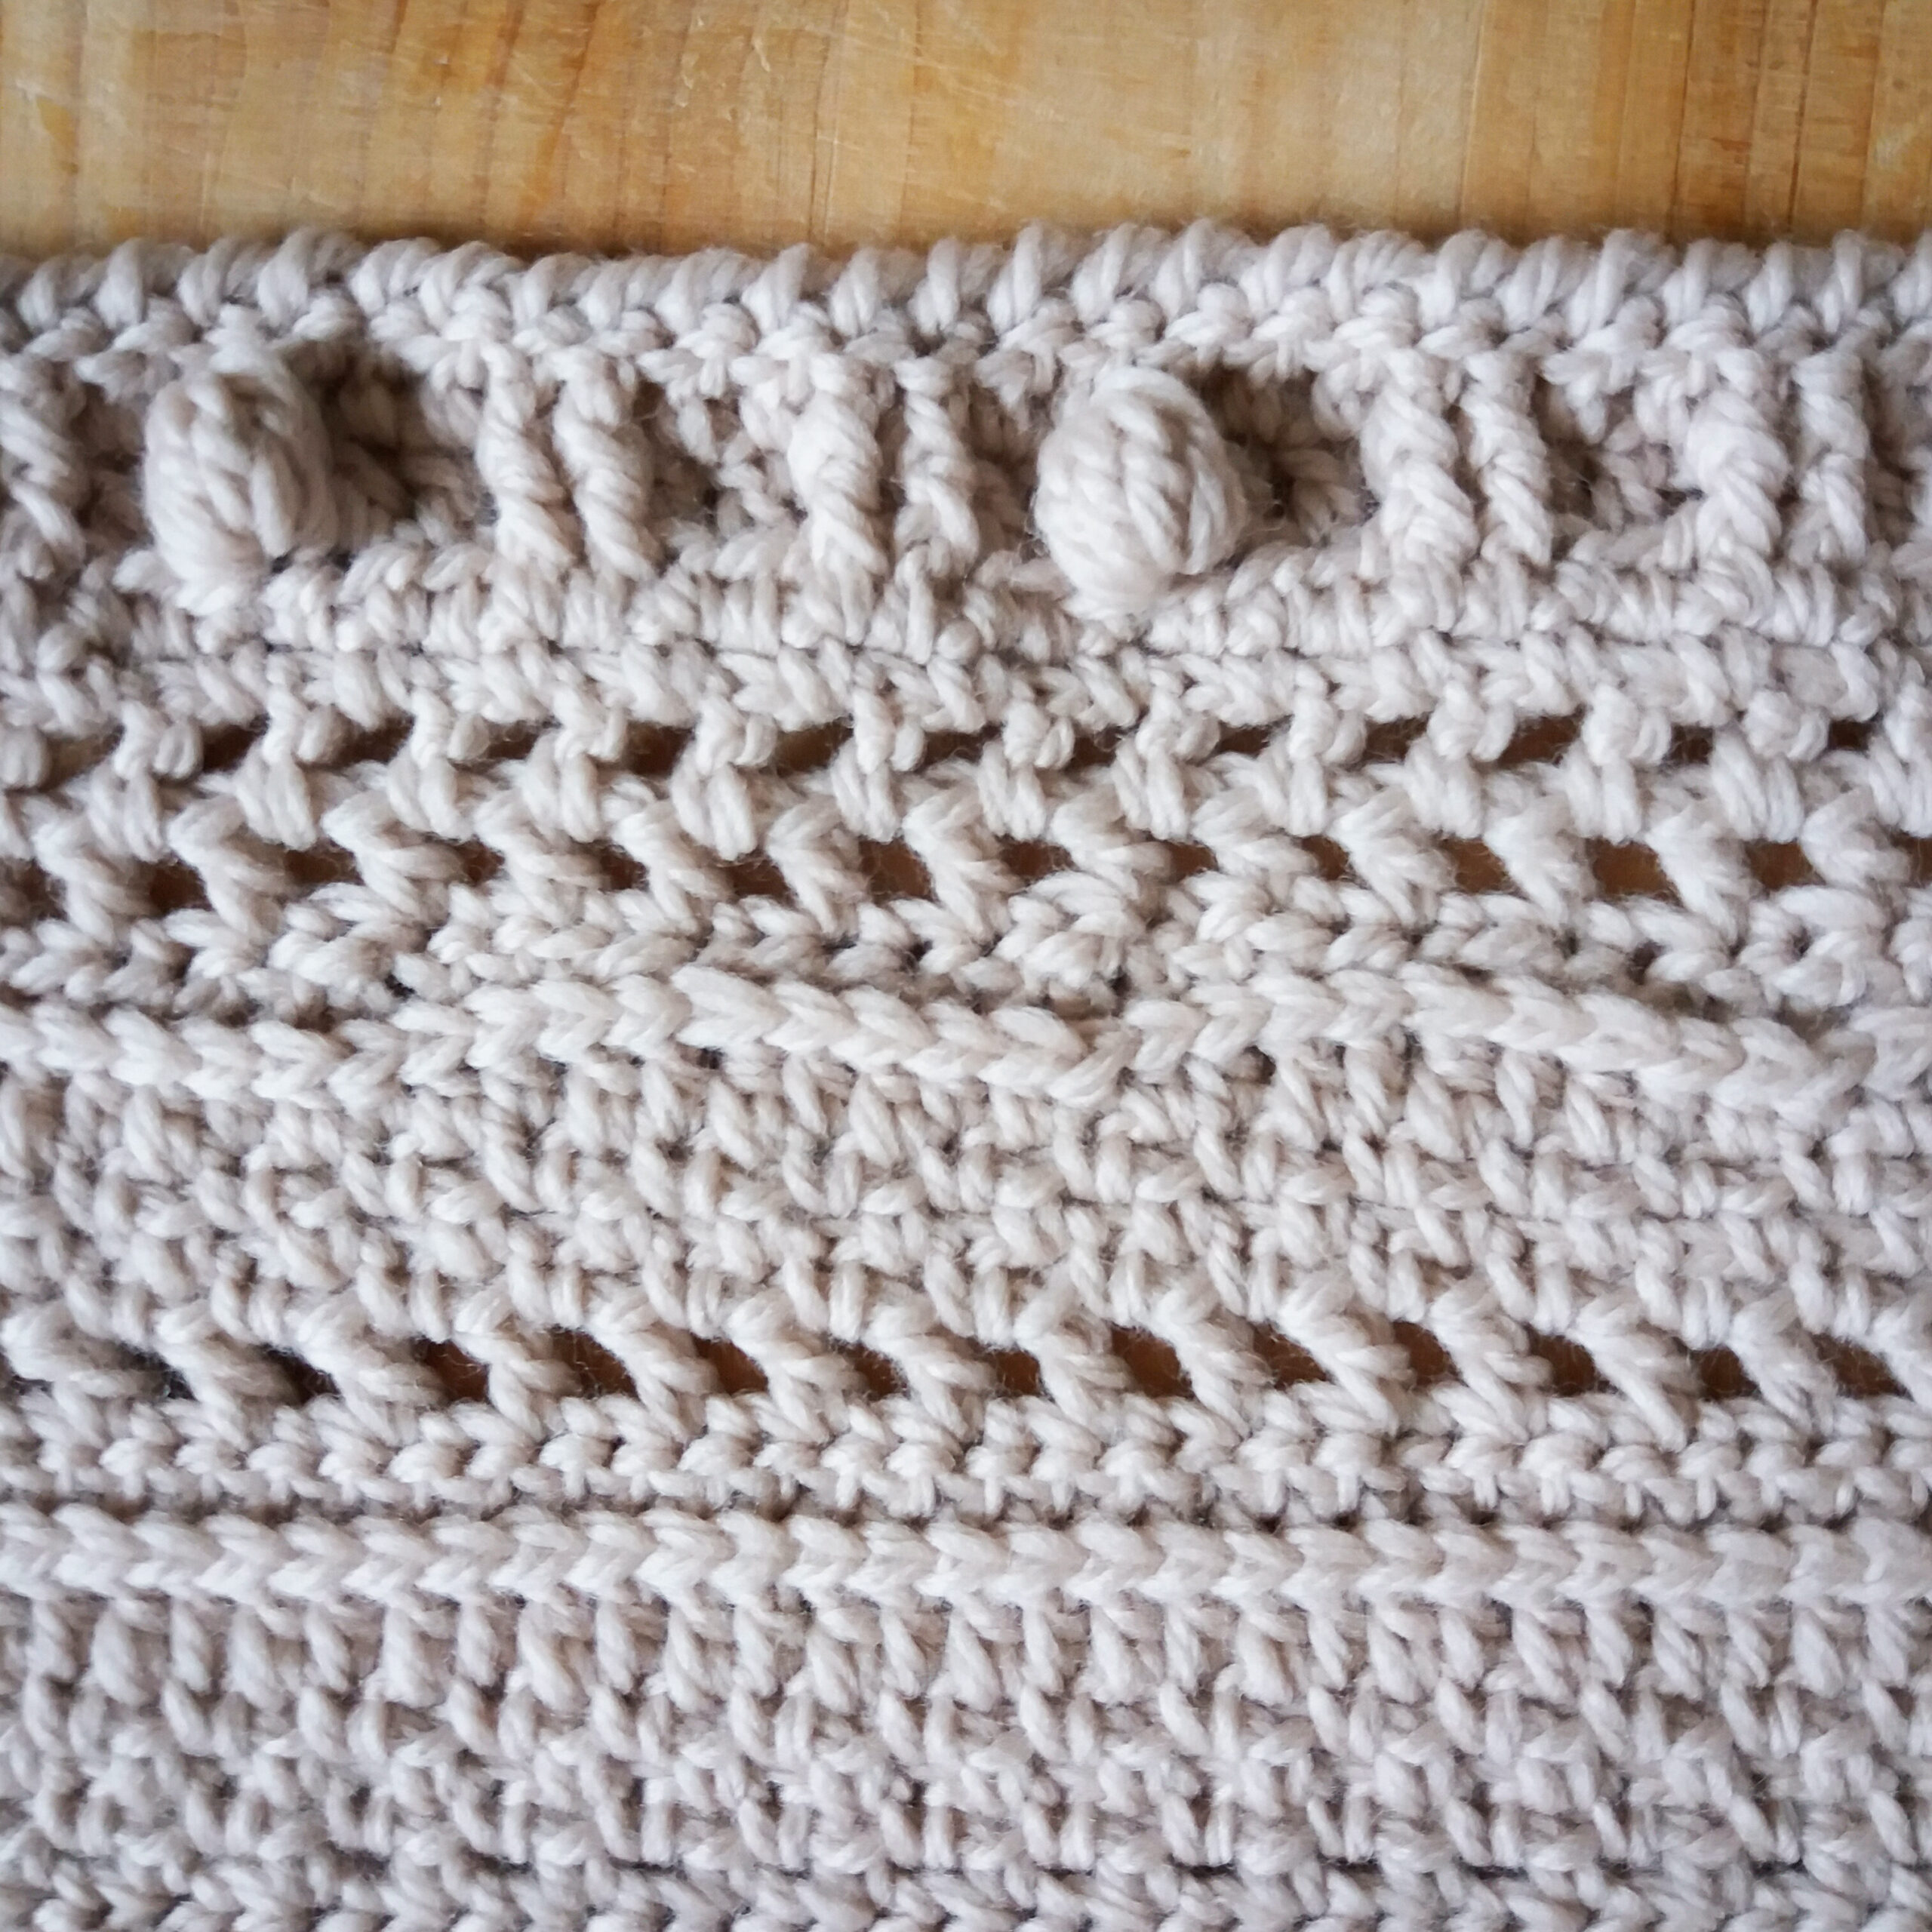
Row 84 : ch 2, 1 sc in last st of prev row, 1 FP(UL)hdc , 1 FP(UL)dc, 1 FP(UL) dc, 1 FP(UL)tr, * 1 FP(UL)dc, 1 FP(UL)dc, 1 FP(UL)hdc, 1 FP(UL)hdc, 1 FP(UL)sc, 1 FP(UL)hdc, 1 FP(UL)hdc, 1 FP(UL)dc, 1 FP(UL)dc, 1 FP(UL)tr * repeat from * to * until M1, (end with 1 dc) [ 1 dc, ch 3, 1 dc ], 1 dc, * 1 FP(UL)tr, 1 FP(UL)dc, 1 FP(UL)dc, 1 FP(UL)hdc, 1 FP(UL)hdc, 1 FP(UL)sc, 1 FP(UL)hdc, 1 FP(UL)hdc, 1 FP(UL)dc, 1 FP(UL)dc * repeat from * to * until M2 (end with 1 FP(UL)hdc) , 1 sc + 1 hdc between last st and ch of the prev row, turn. (= 399 sts)
Row 85 : ch 4, 2 dc in last st of prev row, * ch 1, skip next st, 1 dc *, repeat from * to * until M1, ch 1, skip next st, [ 1 dc, ch 3, 1 dc ], * ch , skip next st, 1 dc *, repeat from * to * until M2, ch 1, 2 dc + 1 tr between last st and ch of the prev row, turn. (= 405 sts)
Row 86 : ch 4, 2 dc in last st of prev row, 1 dc, * ch 1, skip next st, 1 dc *, repeat from * to * until M1, ch 1, skip next st, [ 1 dc, ch 3, 1 dc ], * ch 1, skip next st, 1 dc *, repeat from * to * until M2, 2 dc + 1 tr between last st and ch of the prev row, turn. (= 411 sts)
Row 87 : ch 2, 1 sc in last st of prev row, * ch 1, skip next st, 1 sc *, repeat from * to * until M1, ch 1, skip next st, [ 1 sc, ch 3, 1 sc ], * ch 1, skip next st, 1 sc *, repeat from * to * until M2, ch 1, 1 sc + 1 hdc between last st and ch of the prev row, turn. (= 415 sts)

Row 88 : ch 3, 1 hdc in last st of prev row, hdc until M1, [ 1 hdc, ch 3, 1 hdc ], hdc until M2, 1 hdc + 1 dc between last st and ch of the prev row, turn. (= 419 sts)
Row 89 : ch 4, 1 dc in last st of prev row, 1 FPdc, 1 FPdc, 1 dc, 1 dc, 1 bobble, 1 dc, 1 dc, 1 FPdc, 1 FPdc, * 1 dc, 1 dc, 1 FPdc, 1 FPdc, 1 dc, 1 dc, 1 bobble, 1 dc, 1 dc, 1 FPdc, 1 FPdc * repeat from * to * until M1, [ 1 dc, ch 3, 1 dc ], * 1 FPdc, 1 FPdc, 1 dc, 1 dc, 1 bobble, 1 dc, 1 dc, 1 FPdc, 1 FPdc, 1 dc, 1 dc * repeat from * to * 18 times in total, 1 FPdc, 1 FPdc, 1 dc, 1 dc, 1 bobble, 1 dc, 1 dc, 1 FPdc, 1 FPdc, end with 1 dc + 1 tr between last st and ch of the prev row, turn. (= 423 sts/38 bobbles)
Row 90: ch 4, 1 dc in last st of prev row, * 1 dc, 2 BPdc, 5 dc, 2 BPdc, 1 dc * repeat from * to * until M1, [ 2 dc, ch 1, 2 dc ], * 1 dc, 2 BPdc, 5 dc, 2 BPdc, 1 dc * repeat from * to * until M2, 1 dc + 1 tr between last st and ch of the prev row, turn. (= 427 sts)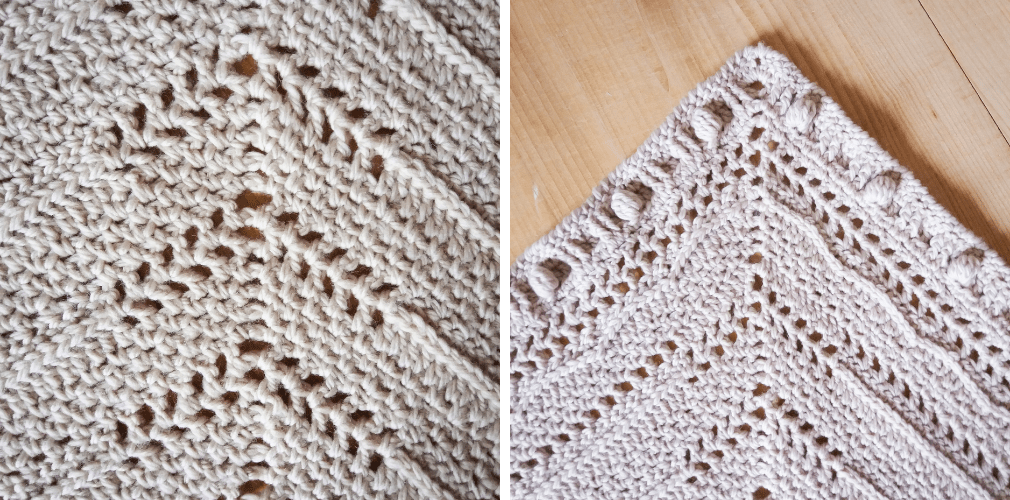
Row 91: ch 1, crochet one row of crab stitches all the way up the shawl (A) (= app 300 sts), 2 crab sts in the ch space of the prev row, continue in crab sts on the two other sides by making [ ch 2 in ch of prev row ]. Finish off with 1 slst in the ch 1.
➳ Weave in ends with the yarn needle. Make and tie a yarn tassel (tutorial below) to the two upper ends of the shawl. Full and free tutorial of the yarn tassels HERE.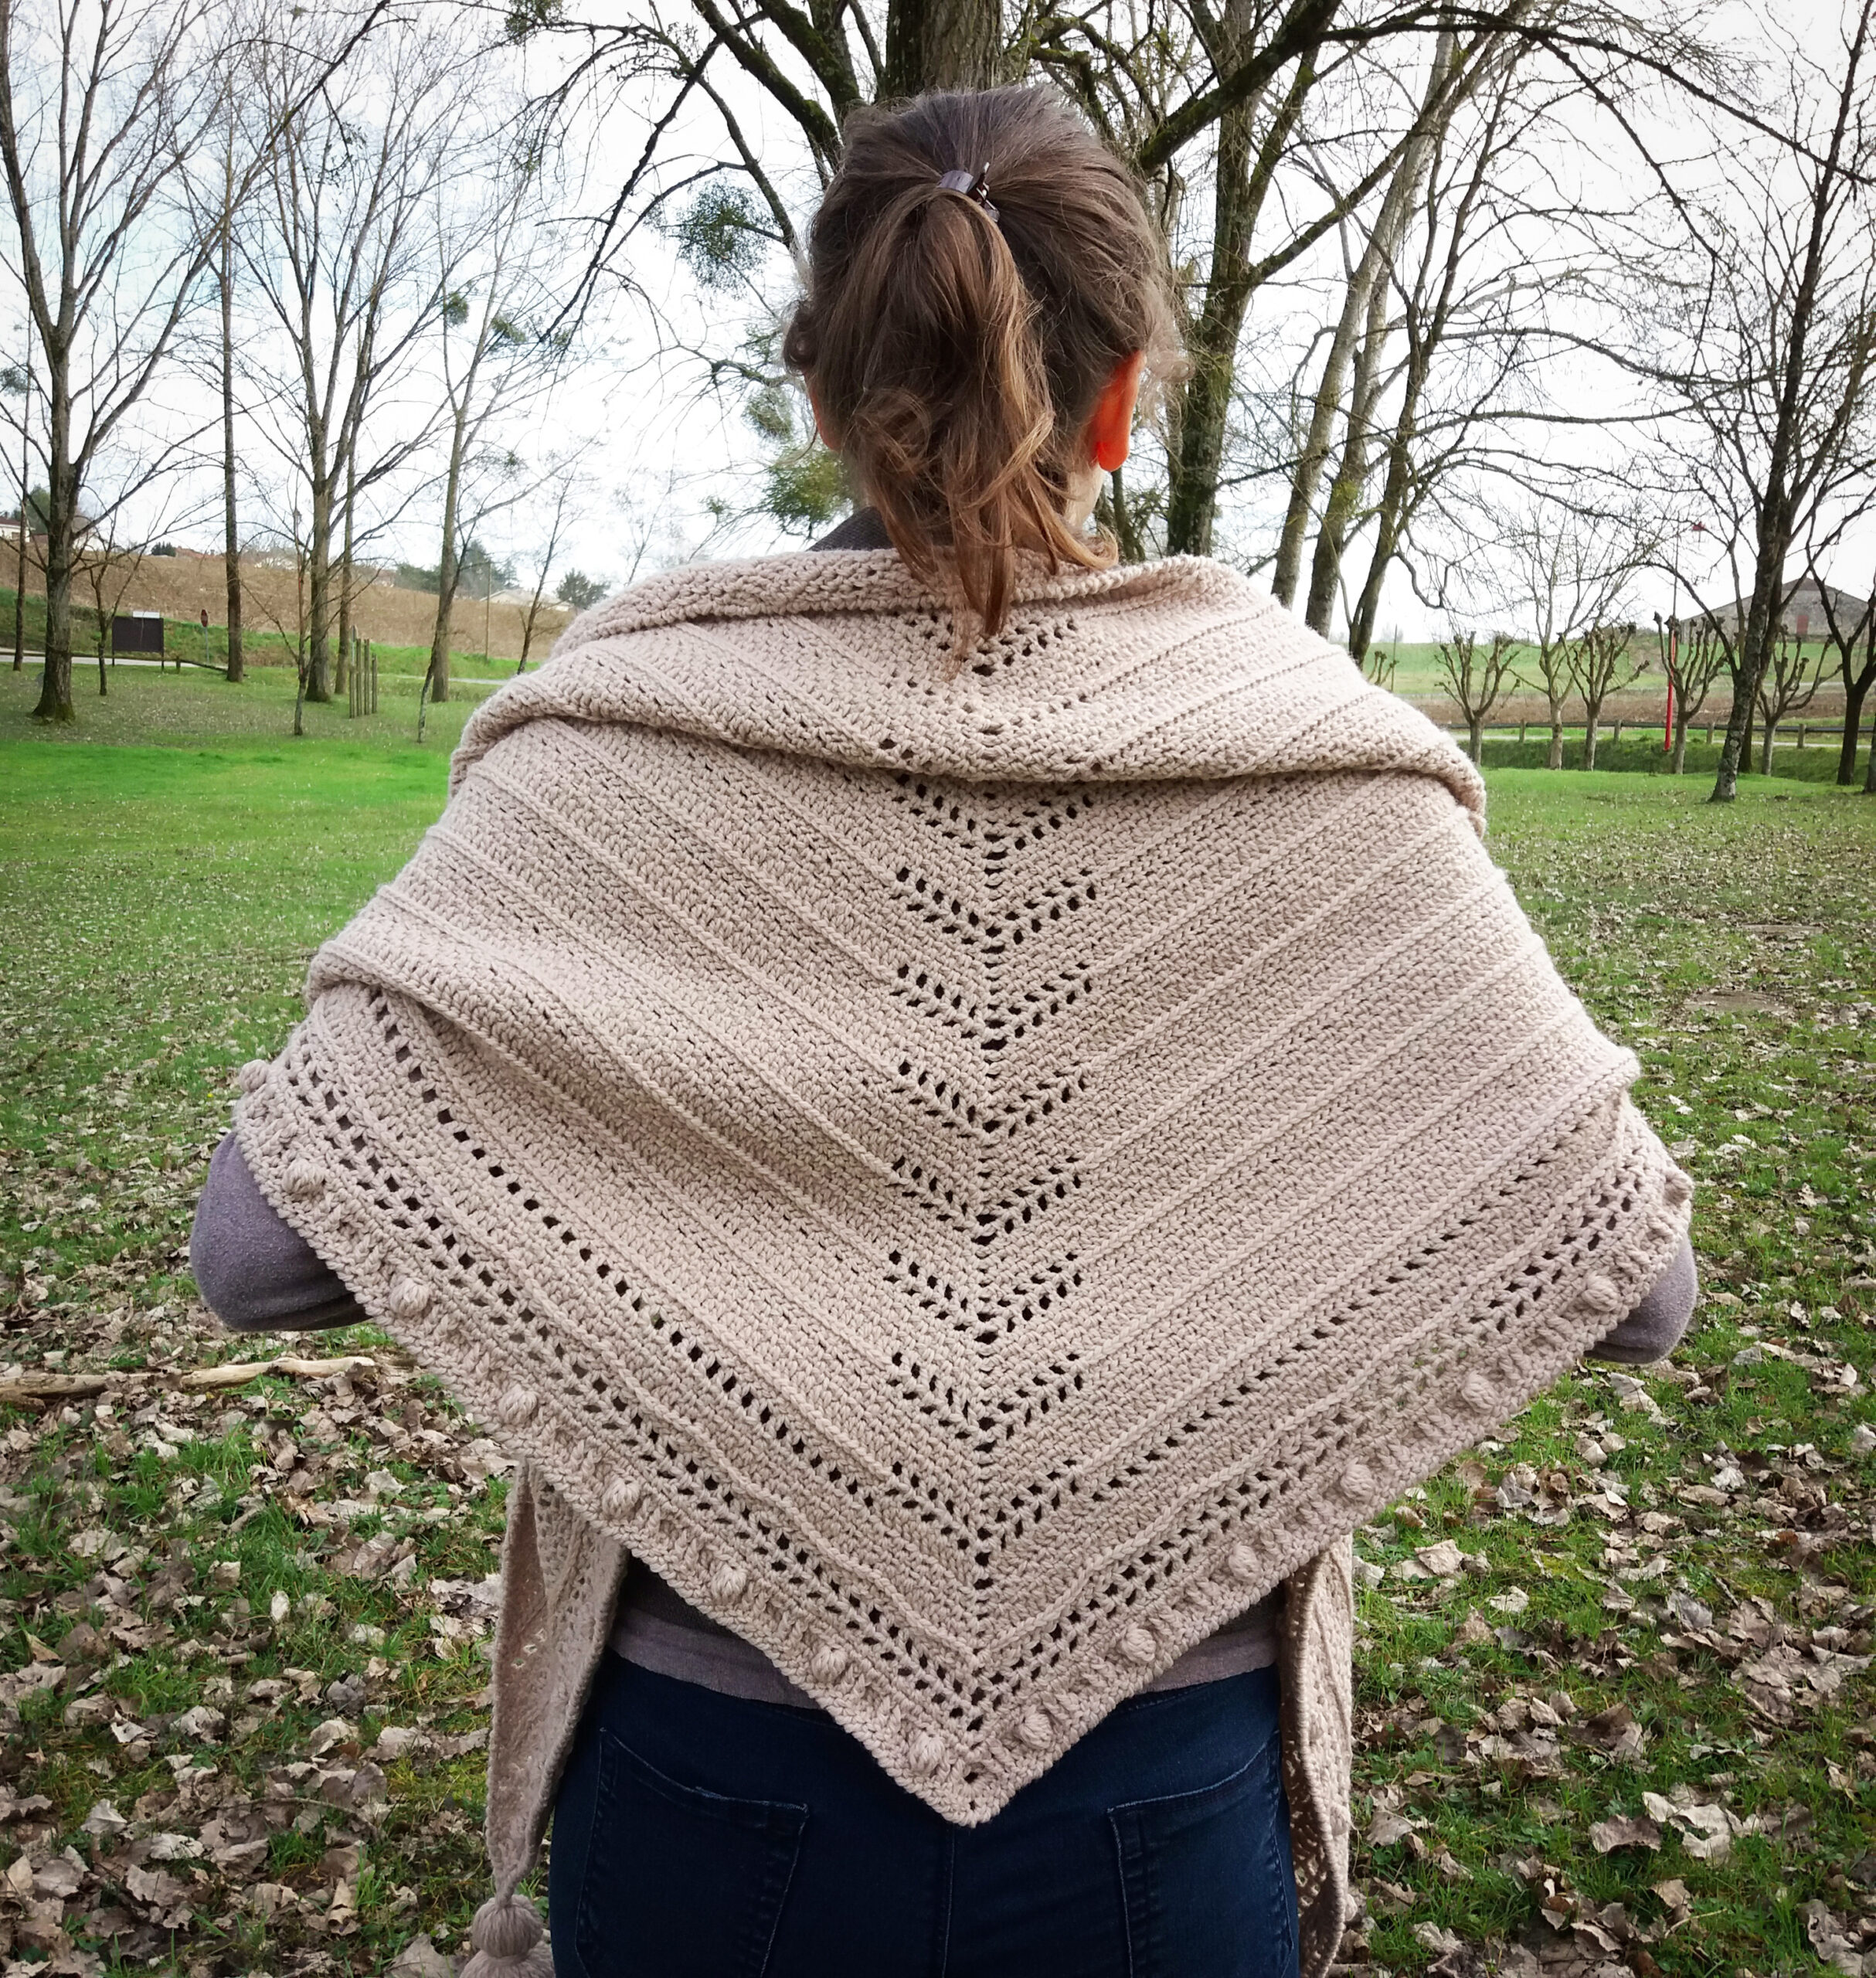
Blocking
So you have finished crocheting your Adenia shawl, now is the time to block it. Do not miss this step! It is the blocking (first bath) which will allow to even out the stitches / textures, set the finished size and flatten any curled effect of the edge for a uniform, clean rendering. To do so:
- Soak your shawl in gentle wash with a small quantity of special wool soap , for a while (around 30 minutes).
- Drain the water, then gently squeeze (don’t wring) your shawl and roll it in a towel to extract as much moisture as possible, press it with your hands or feet.
- Lay your damp item right-side up on the blocking surface and gently nudge the piece to your finished measurements.
- Pin your work around the edges to the correct size.
- Allow to air dry.
Bundle up in your new handmade scarf and head out to find some snow
(or yarn for your next project)!
I hope you loved making your #adeniashawl! Be sure to tag me on social media (@FibreandFolk) so I can share your work!
The patterns and photographs of items on this site are the property of Fibre and Folk and are for personal, non-commercial use only. These patterns files are protected by copyright, and you may not distribute or sell them electronically or physically. If you would like to sell finished pieces made from these patterns please contact me. This post contains affiliate links.
You may also like :